Showing posts with label dress. Show all posts
Cashmerette Appleton Dress in Minerva Luxury Viscose Jersey

Cashmerette Appleton Dress in Minerva Luxury Viscose Jersey


It's hard to overstate just how luxurious the Minerva Core Range Luxury Viscose Jersey is! It is so soft to the touch and drapes perfectly for any number of garments. I chose to make the Cashmerette Appleton dress in the color "raisin" - it will be the perfect addition to my autumn maternity wardrobe and work well in postpartum.

You can head over to my Minerva profile to read all about this dress and my love for the viscose jersey fabric. I need some in nearly every color now!

This fabric was gifted to me in exchange for a post on Minerva's site and this post contains affiliate links. I'm thankful to have the Appleton dress in my wardrobe and can't wait to use the fabric remnants on a few additional pieces. Thanks for your support!

Read more »
Marissa
2 Comments
Colors of Korea Formal Simplicity Dress

Colors of Korea Formal Simplicity Dress


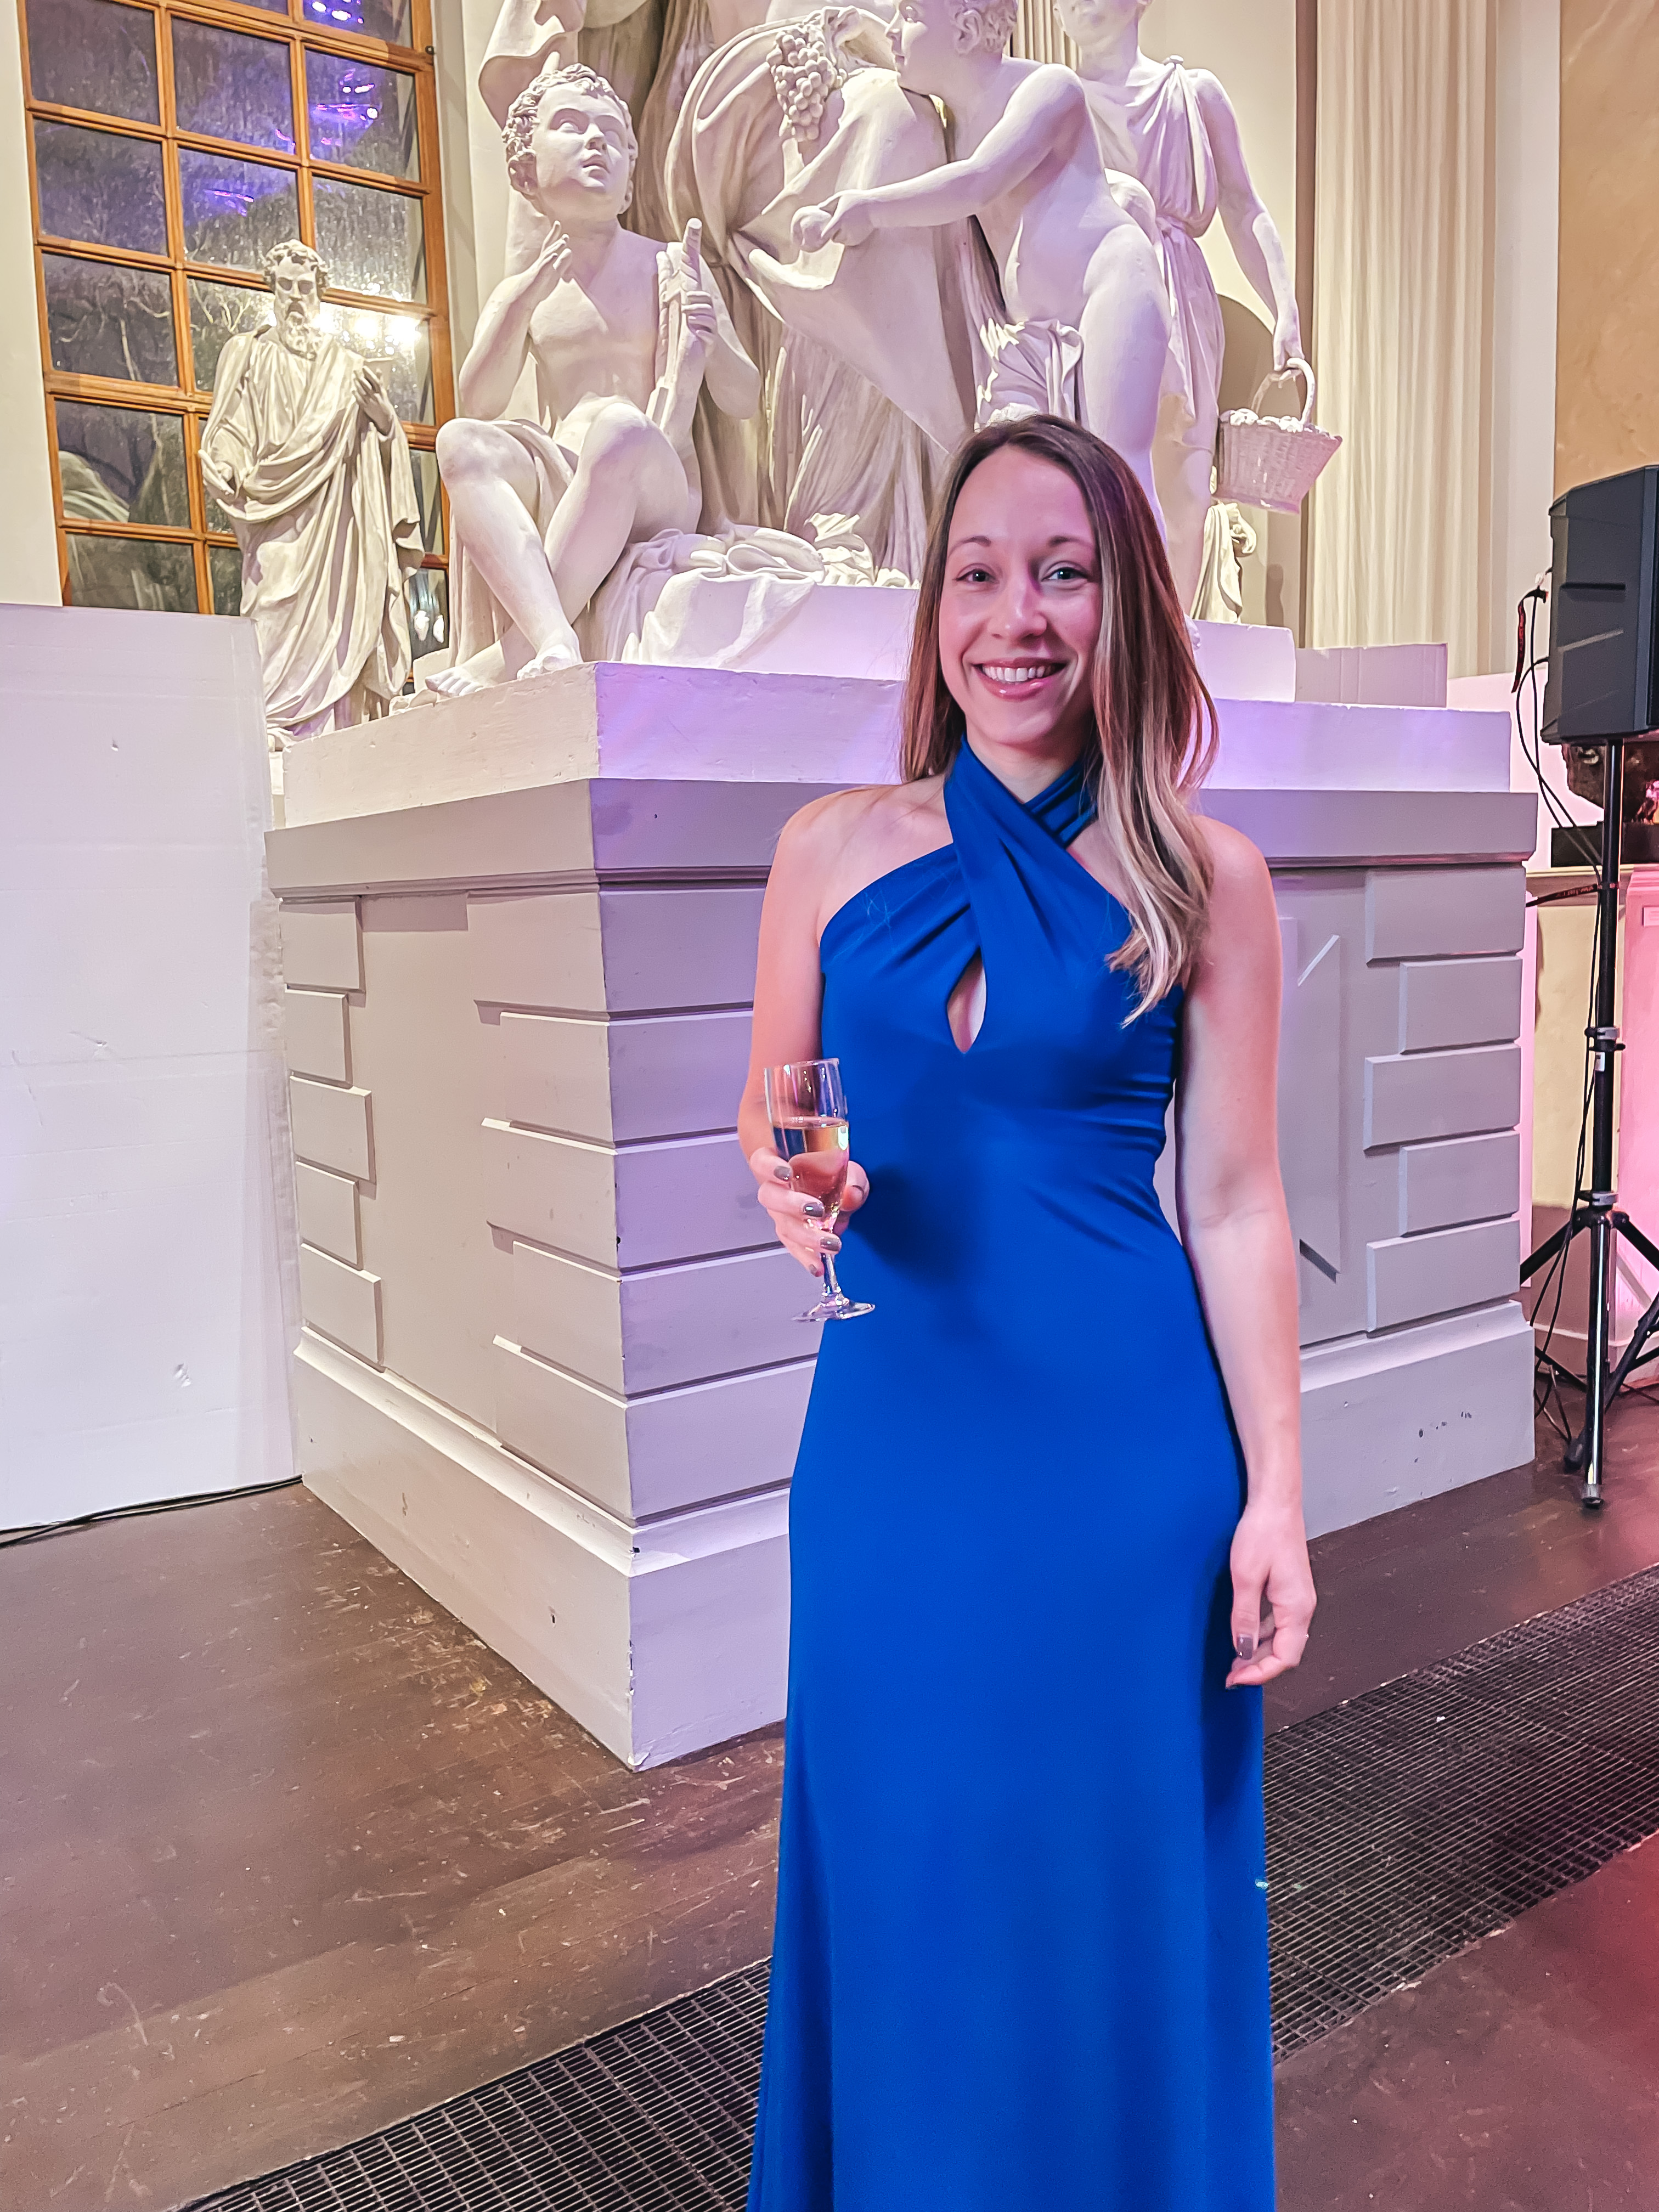
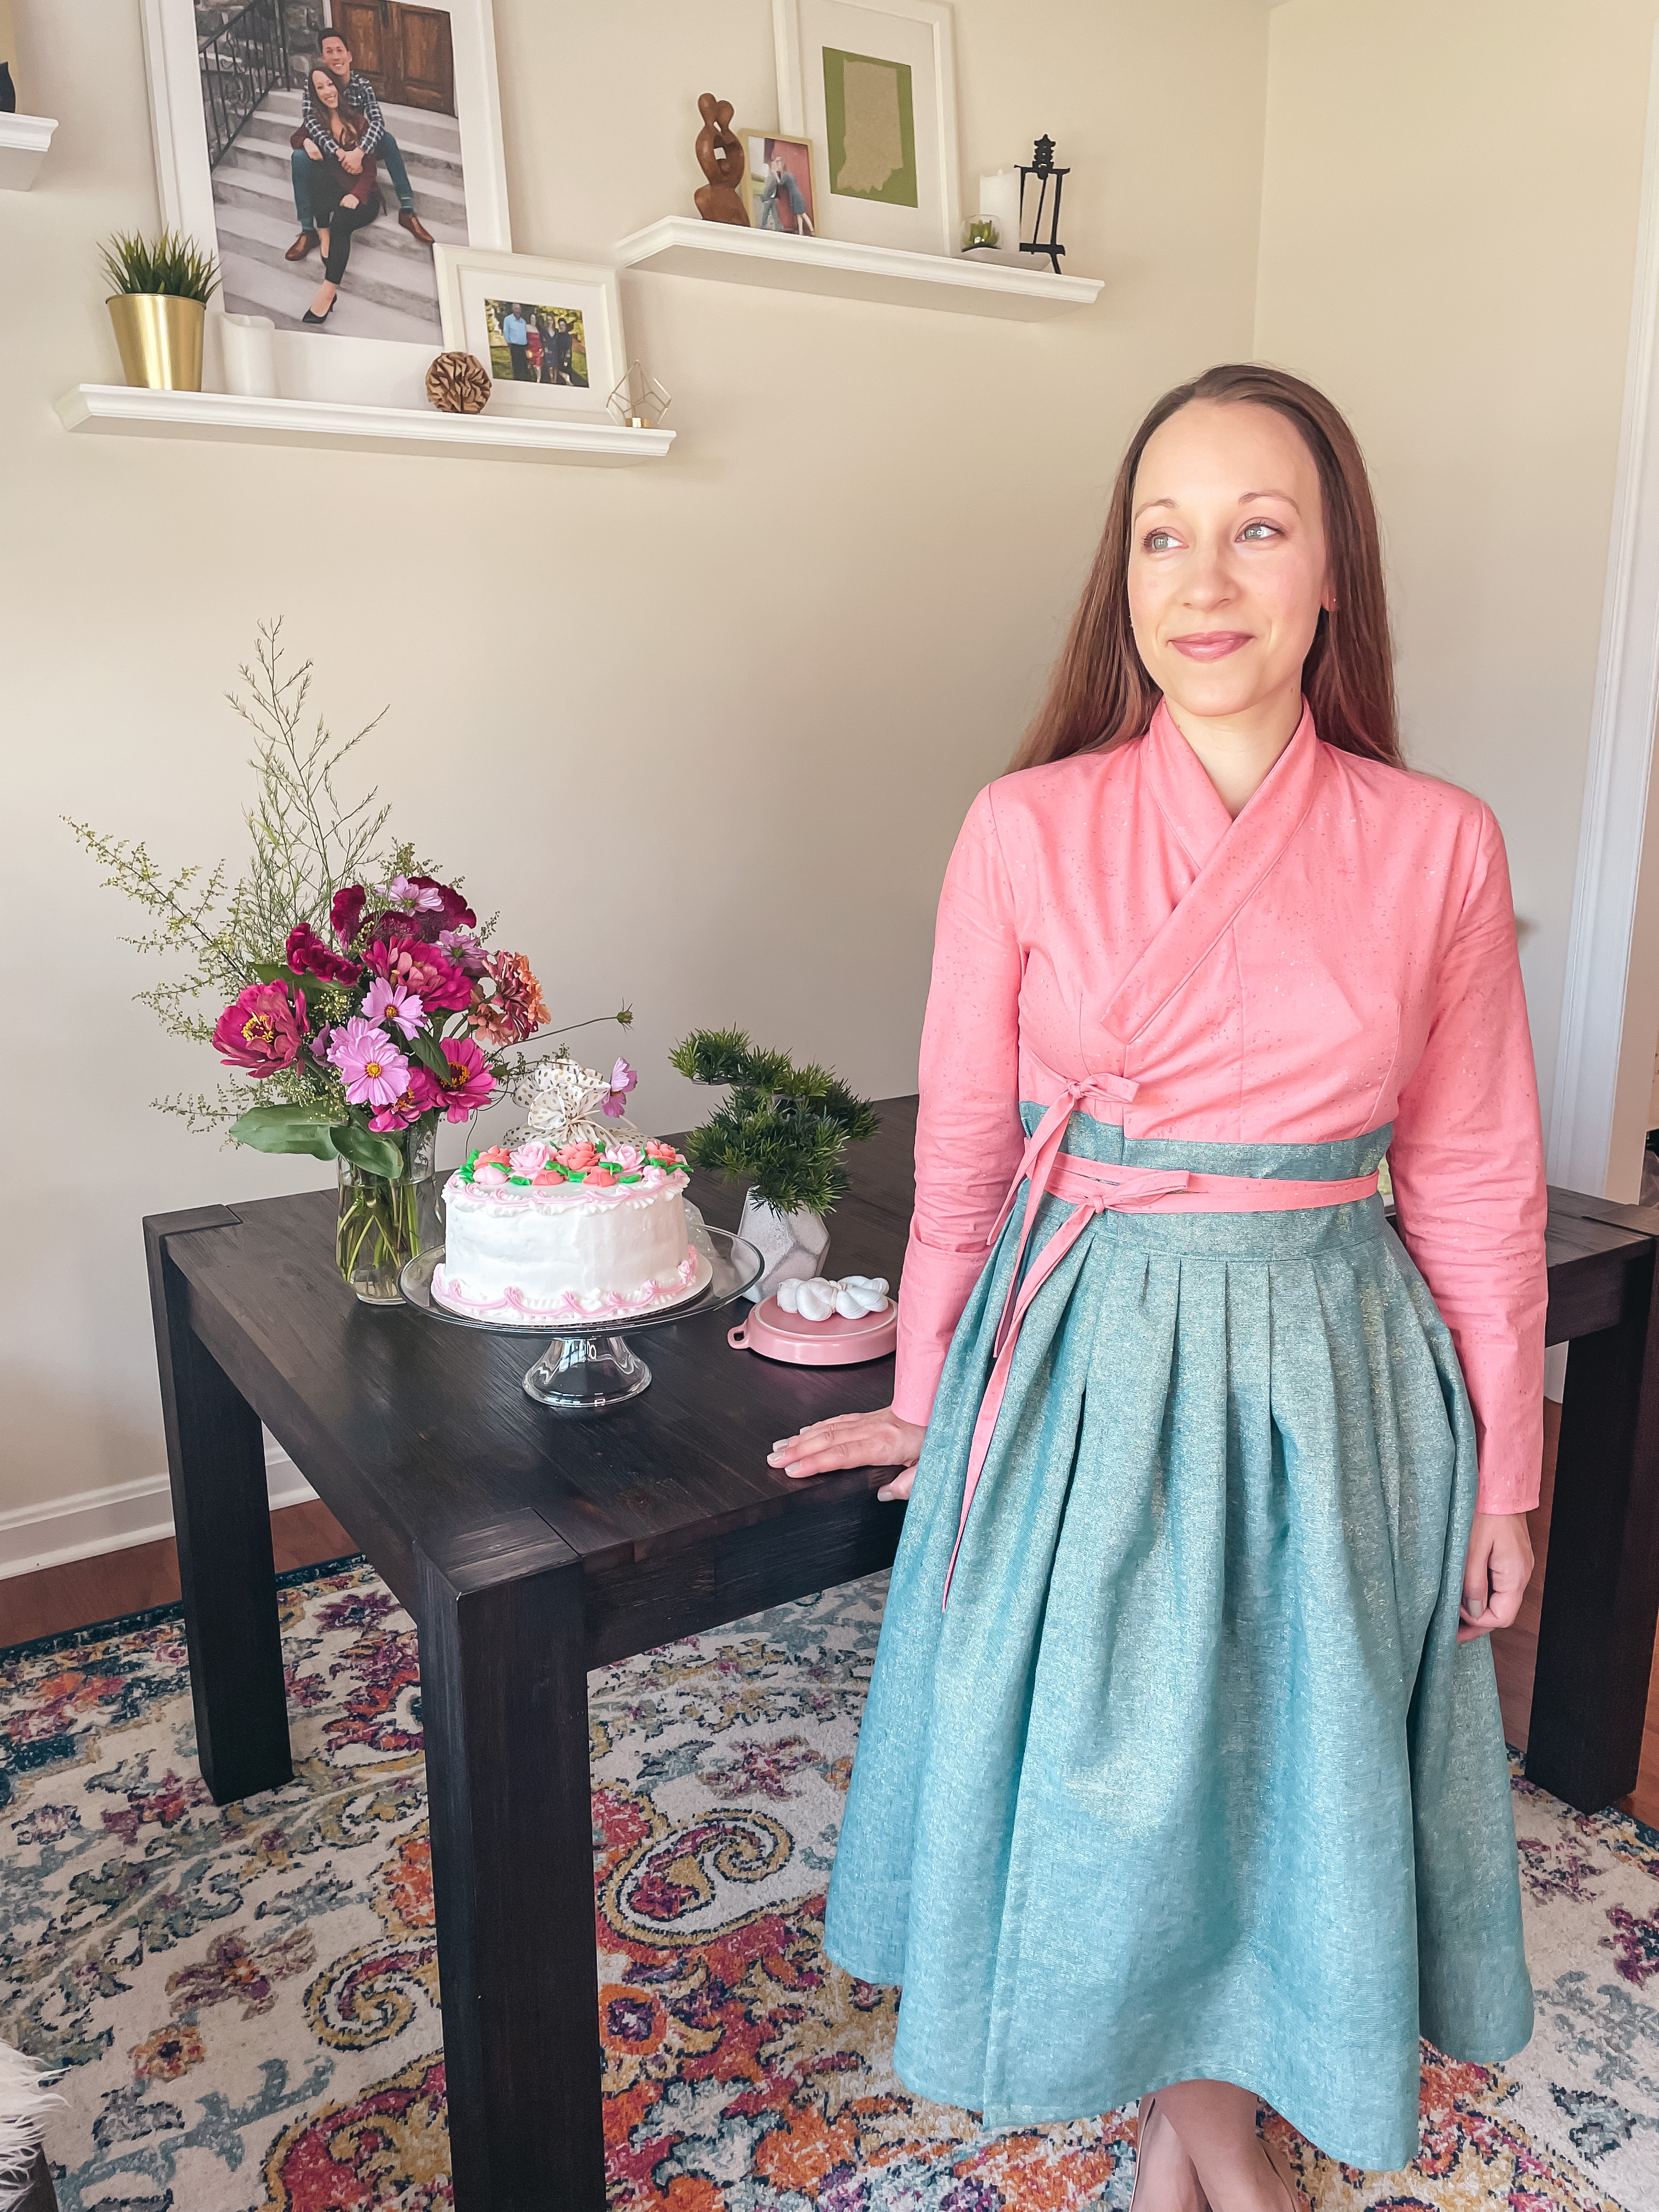
My husband and I recently took a trip to Sweden and attended a formal gala themed "The Colors of Korea." We were asked to wear colors from the South Korean flag and I didn't have a dress for the occasion, so you know I made one!

Over the course of the next year it is my goal that each new make of mine uses a fabric and/or pattern from my stash. I needed to purchase a fabric for this dress since I didn't have one in my stash that fit the dress code so I searched my stash for a pattern I already owned and found Simplicity 2580. I originally thrifted this pattern for a very inexpensive price since it looked like something I would wear, but I didn't have any specific plans for it. Glad I grabbed it when it was available!

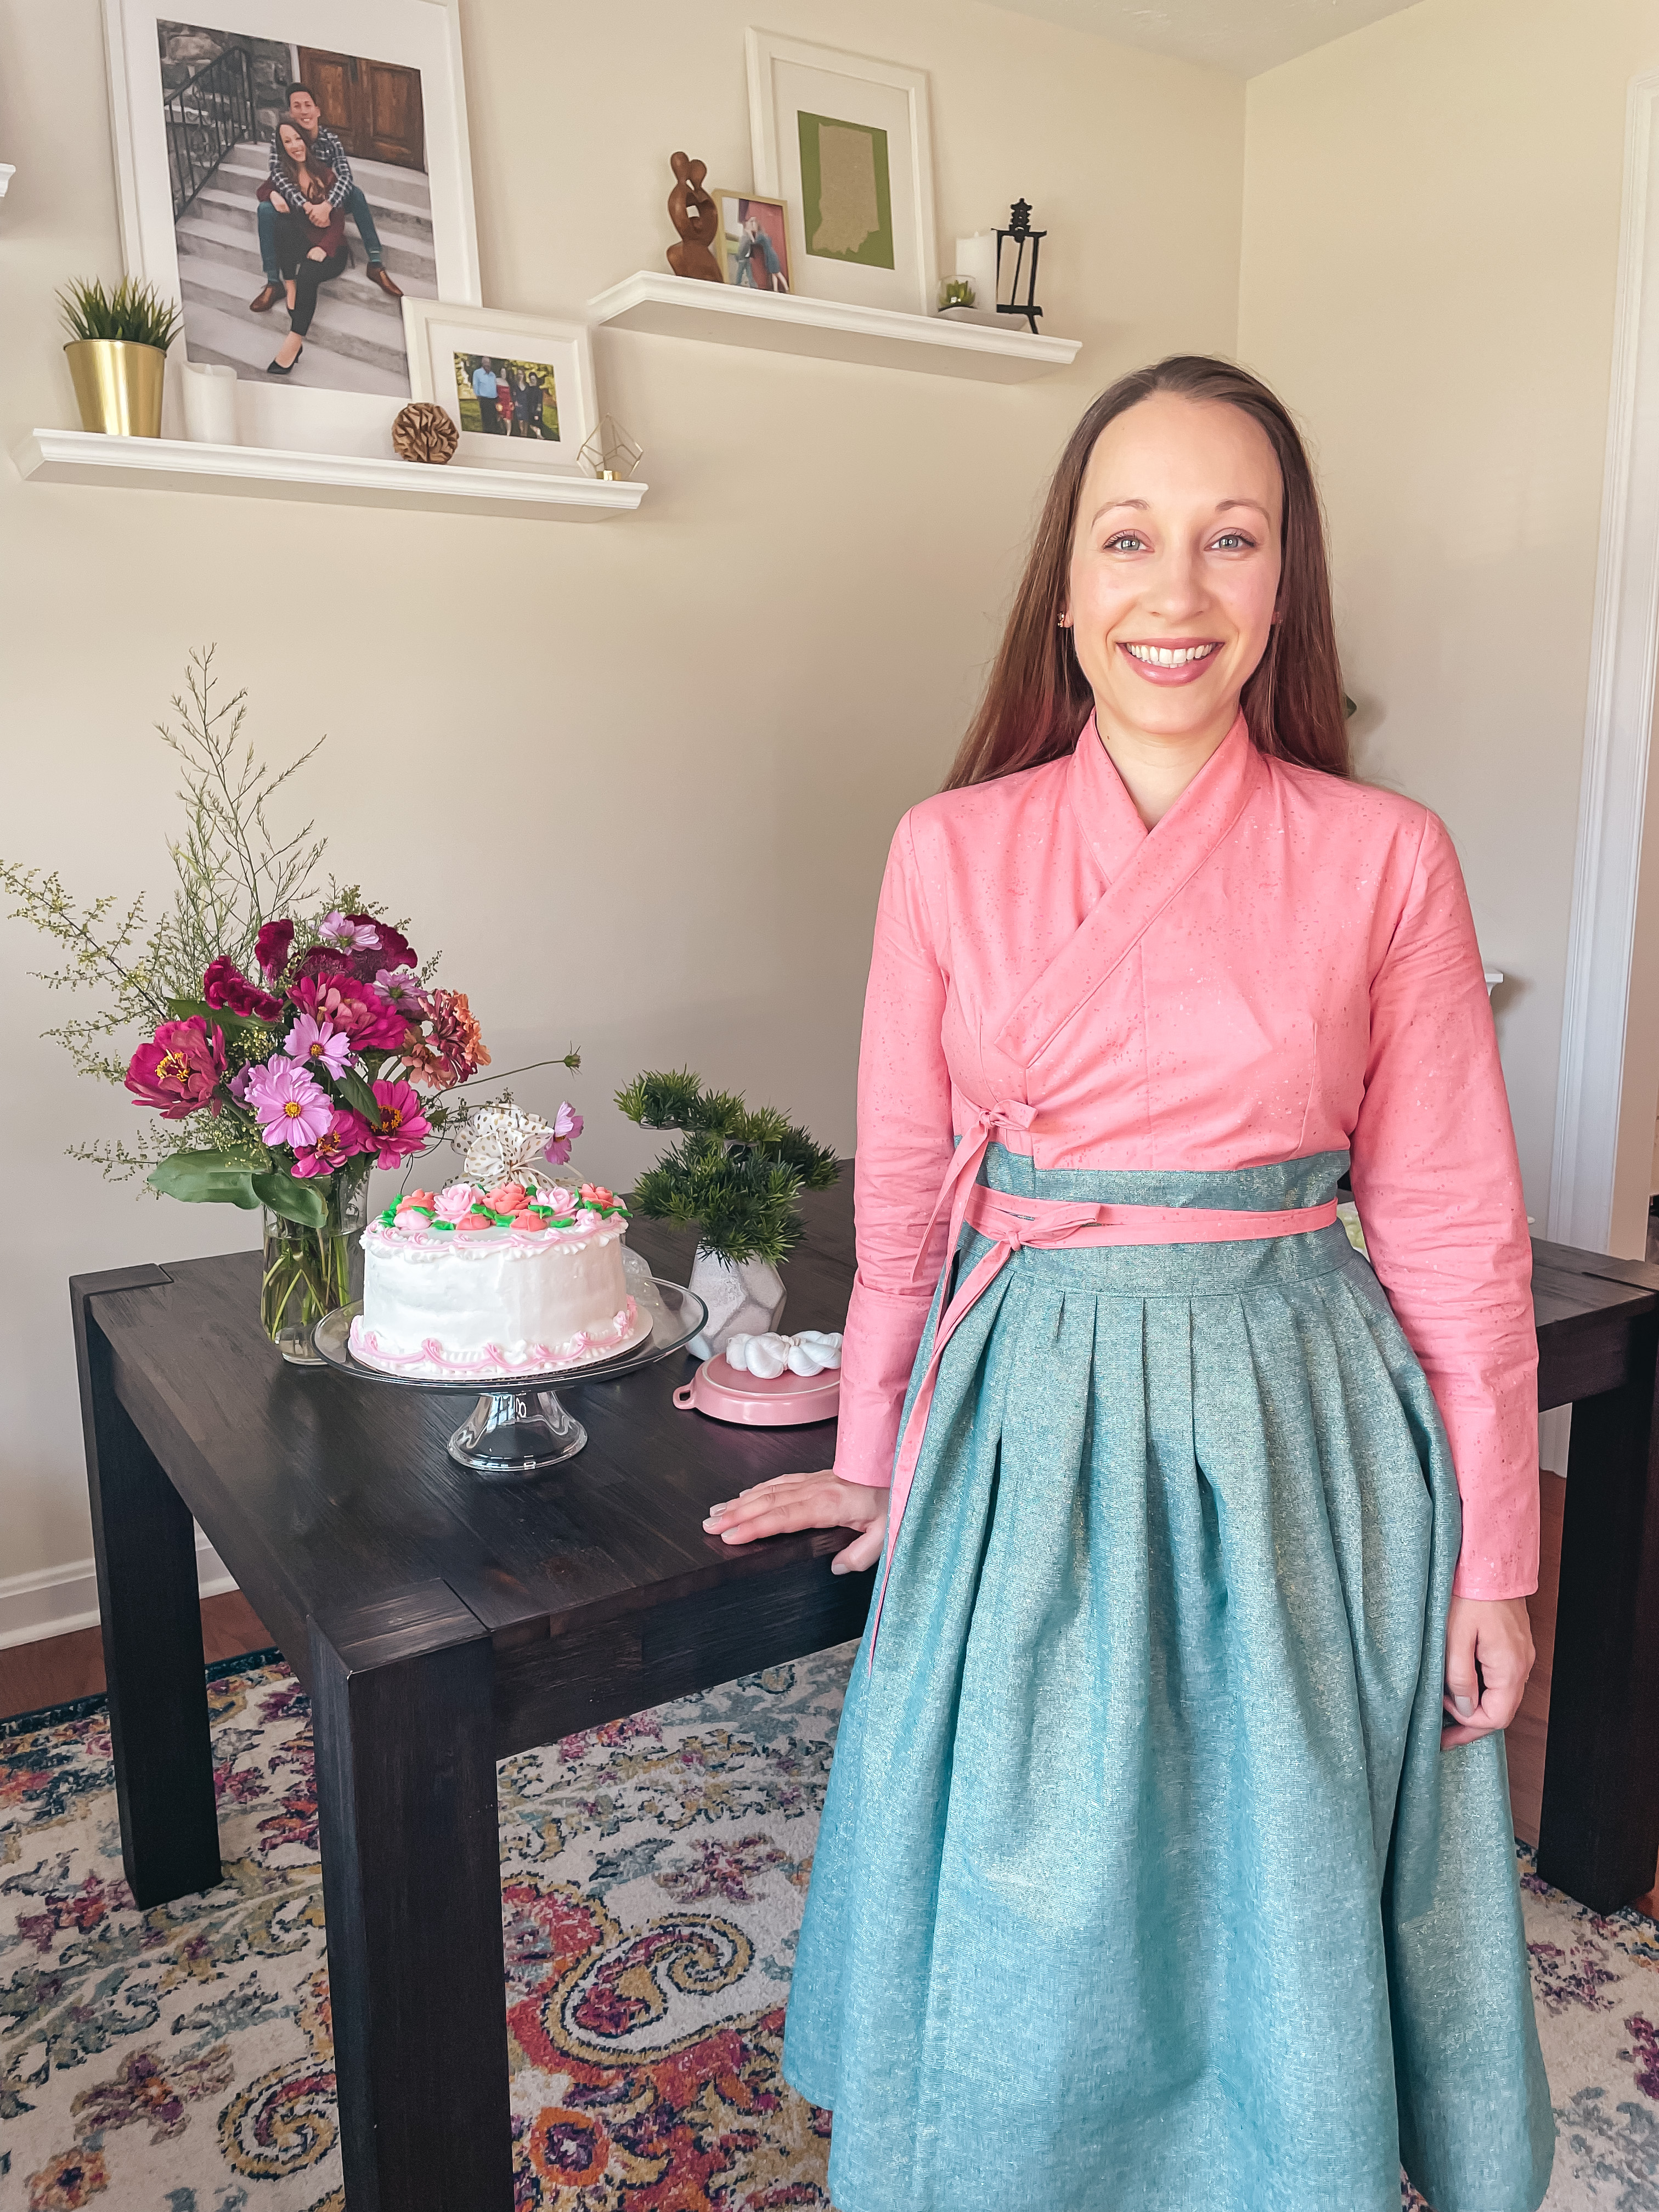
Working with this fabric was a breeze, even when I needed to unpick seams a few times. However, I really struggled with the sizing and ease of this pattern. My measurements had me in a size 12/14 but I am usually a size 10 in Simplicity patterns so that's what I cut. I ended up taking three inches out of the bust in a number of increments and could have taken a bit more out. But the hips were a good fit so I graded from the under-bust to the hips. Thankfully there was elastic in the center back to help hold the dress up.

This view of the pattern called for a tie closure behind the neck but I decided to trim down the ties and sew them together at the center back to create a more formal look. To get into the dress I really have to shimmy my head through the opening. This may not have been the best idea, but it was the quickest fix. I also cut an additional three and half inches off before the bottom of the skirt before hemming it.

Ultimately the dress looked great and I felt comfortable eating in it. However, the weight of the fabric pulled the dress down as the night wore on and I needed to readjust the tension at the front of the neck multiple time throughout the night. It was choking me! I may wear this dress again because I've already made it, but I honestly wouldn't make View E again.

Pattern: View E of Simplicity 2580, printed in 2009
Size: 6-10
Fabric: 2 1/2 yards of matte jersey knit fabric with 50% stretch, 94% polyester and 6% lycra, machine wash and line dry
Time: 4-5 hours due to fit issues, it should have taken much less time

Cost to Make:
pattern - $1-5, I can't remember the exact cost
fabric - $8.99/yard, for a total of $22.50 (but it often runs 30%)
*elastic and thread from stash
TOTAL VALUE: approximately $25
Read more »
Marissa
0 Comments
Cashmerette Lygon Robe in Minerva Deluxe Viscose

Cashmerette Lygon Robe in Minerva Deluxe Viscose


It has been a pleasure joining Cashmerette on their fall Cashmerette Club pattern releases. This month they released the Lygon Robe, a super luxe robe with prominent channel stitching and optional accent fabric. I used Minerva Core Range Deluxe Viscose Challis in fuchsia and a few remnants of the Minerva Exclusive Dynamic Brushstrokes to create a soft and flowy robe. Join Cashmerette Club this month to receive the Lygon Robe pattern and to read all about my make head to my Minerva page!

The Lygon Robe pattern was gifted to me in exchange for photos of the finished garment and fabric for this make was gifted to me in exchange for a post on Minerva's site. This post contains affiliate links and I appreciate your support!

Read more »
Marissa
0 Comments
Vintage McCall's in Dynamic Brushstrokes

Vintage McCall's in Dynamic Brushstrokes


I am in love with this pairing - the 1979 McCall's wrap dress and Minerva Exclusive Dynamic Brushstrokes viscose challis. Whether I wear the wrap in the front or the back I feel so elegant in this dress. Visit my profile on the Minerva blog to learn more about this make and purchase your own Dynamic Brushstrokes viscose challis through my affiliate link here.

This fabric was gifted to me in exchange for a post on Minerva's site and this post contains affiliate links. I'm loving this dress and appreciate your support!

Read more »
Marissa
0 Comments
Baby A’s Easter Dress

Baby A’s Easter Dress


I made the Little Lizard King's Monet for Baby A's first Easter dress because the shape closely resembles my new Essex Dress. I absolutely love how it turned out; she on the other hand could deal with less ruffles so close to her face. Ha!

This dress was a fairly simple sew and the cotton was a breeze to work with. I changed the top sleeve ruffle layer slightly by adding a seam in the middle to compensate for the directional print. Top stitching the ruffle sleeves down was a bit bulky and didn't look as crisp as I usually prefer although I don't notice that once Baby's in the dress.

I made a "hand stitch" boarder on the front bodice piece with my new Pfaff Expression 710. I was able to taper the stitch to 30 degrees at the corners and really like the delicate detail of the tone-on-tone stitches.


Three glass buttons up the back finish the dress and don't detract from the fabric or compete with the pattern details. However, the back placket on the skirt is my least favorite part of the dress. I found it hard to make the placket lay flat without a pucker at the bottom pivot point. Thankfully the skirt is gathered and hides this little imperfection.


Pattern: Little Lizard King Monet
Size: 12m
Time: Estimated 3-5 hours (who can tell with the interruptions of sewing around nap time?!)

Cost to Make:
pattern - $9.50
fabric - $16.00 (purchased on discount)
buttons and thread from my stash
TOTAL: $25.50
Read more »
Marissa
0 Comments
Essex Dress in Cotton Poplin

Essex Dress in Cotton Poplin


I recently made the Essex Dress by Sewing and the City. I loved the style as soon as I saw it released late last summer and knew I would need to make one myself. In preparing to make this dress I searched Instagram for other people’s versions and their feedback. Many mentioned that it was a touch short and the V was a bit deep. I decided to address these common fit issues while cutting out my pattern. 

Based on my measurements I should have been a size six, but after reviewing the final garment measurements I decided to make a size two and I’m glad I did. (I decided this after a tissue fitting of the pattern. Thankful Sewing in the City includes cut and stitch lines on patterns!) I’m 5’1” and added one inch to the bottom of the skirts pieces. I wouldn’t want it any shorter! I also raised the fabric of the V by pivoting the front bodice piece on the upper shoulder point one inch from fold (at the deepest point of the V.) After a few pin fittings I also decided to raise the center seam 1 1/2”, which worked because I have a smaller bust. I’m very happy with the results and will make these adjustments again in the future.


I love working with all wovens, especially cotton shirting, because it isn’t slippery and can so easily be persuaded to do what you want it to do with a bit of steam. Cotton is a natural fiber and has great breathability and adaptability to climate, it deals with temperatures changes well. And as I’ve worn this cotton shirting I’ve found it wrinkle resistant too! 

I like to make blouses/tops and daily wear dresses with cotton shirting. It’s also great for little girl dresses, which I plan to be making a lot more of in the near future! The addition of bias binding to the flutter sleeves of this dress allow them to keep their shape and be a real statement! This fabric and notions were gifted to me by Style Maker Fabrics and you can learn more about cotton shirting on their blog here.


Pattern: The Essex Dress by Sewing and the City
Size: Two, lengthened on inch and adjusted neckline
Time: Estimated 5-7 hours with fitting and adjustments

Cost to Make:
pattern - $16
fabric - $30 value
bias tape - $6 value, 3 yards organic cotton bias tape
elastic - $2 value, 2 1/4 yards of 3/4" elastic
TOTAL: $56 VALUE
Read more »
Marissa
0 Comments
Birthday Dress

Birthday Dress


I recently had a color analysis and learned I was a “calm summer” and should focus on garment fabrics that are cool, light and muted to highlight my best features. As soon as I saw this beautiful John Kaldor cotton sateen that featured at least three of my best colors I knew it would make the perfect birthday dress!

You can learn all about how I made it on Minerva now. And to make your own special outfits with this beautiful John Kaldor cotton sateen visit my affiliate link.

This fabric was gifted to me in return for a post and this post contains affiliate links. I love my birthday dress and will certainly work with this cotton sateen again! Thank you for your support.
Read more »
Marissa
0 Comments
Modern Hanbok

Modern Hanbok


This past weekend I had the great pleasure of celebrating my daughter's first 100 days of life. It's amazing how much she's changed and grown already. As we've fallen into a more regular pattern I've begun to find small amounts of time to sew. I purchased Baby A's formal hanbok for her party online, and was thankful not to have the pressure of getting her dress done on time. However, women's hanboks were quite expensive and I wanted to coordinate with her perfectly so I decided to make my own.

The pattern I used is designed for woven fabrics so once Baby's hanbok came in the mail I took it to my local quilt shop Crimson Tate to find coordinating fabric for my dress. I ended up with a Rashida Coleman-Hale Speckled Metallic Sorbet in pink for the top and Robert Kaufman Metallic Yarn Dyed Essex Linen in emerald for the skirt and love how it coordinated with Baby's outfit.

The pattern instructions and pieces are written in Korean so I leaned heavily on Sewing Therapy's video tutorials - thank you Sara! A few key differences she pointed out about this pattern were new-to-me pattern marks and the need to add seam allowance. I also had a difficult time reading and understanding the size chart - I made a size small but probably should have sized up at least one size and made a medium.

We weren't able to have a large celebration due to the pandemic, but we were able to celebrate in style with our family and couldn't have been more happy. I can only imagine what the next 100 days will hold.

Pattern: Dailylike Adult One-Piece Hanbok
Size: small
Fabric: Rashida Coleman-Hale Speckled Metallic Sorbet (Pink) for the top and Robert Kaufman Metallic Yarn Dyed Essex Linen (Emerald) for the skirt
Time: I would guess 5-8 hours, between watching the video tutorials multiple times, tracing the pattern, cutting and sewing the garment. But it's hard to tell when you try to squeeze all that making into naptime!

Cost to Make:
pattern - $19
fabric - $58
interfacing and thread from my stash
TOTAL: $77
Read more »
Marissa
0 Comments
Nursing Willow Wrap Dress

Nursing Willow Wrap Dress


I purchased the Love Notions Willow Wrap dress when it was a featured Friday pattern earlier this spring. I love the wrap style and this pattern comes with both maternity and nursing options - a huge win at this point in my life! Soon after buying this pattern I won a $20 gift card to Style Marker Fabrics through Love Notions and set to picking out a great fabric to make this dress - but I found too many options! After posting a few poles on Instagram you all helped me pick this gorgeous floral with a navy background - a favorite of mine.

I had the pattern printed through PDF Plotting and was working on cutting it out when I went into labor. I cut a size medium, based on my then current measurements, and was able to sew it together during a few extended nap times after baby's arrival. 


As a new mom it felt like a huge feat to spend any amount of dedicated time in my sewing room. I really appreciated that this Love Notions pattern came together so quickly and looks so polished. Most of the pattern is sewn flat and then one long seam up the side brings the whole garment together. Although this form of assembly is very quick, one drawback is the inability to fit the garment until near the end of construction. I used knit stay tape for the hem and, after serging the edges, used a regular straight stitch to complete the dress since I wasn't worried about this hemline needing to stretch. My favorite feature of this pattern is the knit neck binding, a skill that I will use on other knit garments in the future.


At this stage of motherhood and nursing I'm enjoying wrap style tops and dresses best so I can push the fabric to the side and see baby's latch. I was so glad to have this option for appointments in my early days after her birth. In the future I will size down, try a few different side gather options, shorten the skirt an inch or two, and add pockets in the side seams. I just love this dress - look for more Willow Wraps coming to my wardrobe soon!

Size: Medium (based on then current measurements)
Fabric: Romantic Vine Floral Jersey Knit in navy
Time estimate: 5 hours, including cutting and sewing

Cost to Make:
pattern - $5 ($12 value)
pattern printing - $17
fabric - $27 ($38 value, plus shipping and taxes)
thread - $2 (using Style Maker's thread matching service)
knit stay tape - from stash
TOTAL: $51
Read more »
Marissa
0 Comments
Cara Maternity Dress

Cara Maternity Dress


Today's post is a guest blog written by my mother, who graciously made a few maternity garments for me early in my pregnancy when I didn't have the energy to sew.

When our daughter announced that we would become grandparents for the first time my heart leapt for joy. I was ready to make A.L.L. the things for the baby, but decided I should consult the parents before I went wild.  Marissa suggested a few clothing items to round out her maternity wardrobe would be especially helpful. She selected the Megan Nielsen pattern Cara and ordered fabric from So Sew English. I was delighted when I received that package. The fabric was a rich red Modal with a wonderful drape. I printed out the pattern and got right to work. It is a bit tricky trying to sew for someone so many miles away but I relied on fitting the pattern to myself and sending selfies, and video chats with Marissa for "sewing consultations". 

To extend the top pattern to dress length I compared it to a ready-to-wear dress in a length I liked. The shirt pattern had already made adjustments for a pregnant tummy and hips so I simply extended the length, with a slight flare to allow for walking.

Isn't it great that we are so close in height too? I scoured the comments on the Megan Nielsen blog and gleaned lots of tips and suggestions that I found helpful. I noticed how often women suggested that adding elastic to the ruching was critical, and created a nicer end product. I think this suggestion was essential to creating the nicest finished product when using such a drapey fabric. 

In the end I adjusted the sleeve width, bringing it in a full inch. I  also made a few adjustments to the shoulder area, bringing it in one inch to bring the shoulder cap up and taking 1/2" off the top of each shoulder seam, lifting the entire garment up and shortening the neckline and armscye. I finished the dress with a twin double needle hem. I always use wash away stay tape on knits hems and found that step especially important with this lightweight fabric.

Actual sewing time was probably about an hour, but I spent a couple more hours preparing the fabric, adjusting the sizing, "tissue fitting" and video chatting. I wanted  this to be the perfect feel good to wear maternity wardrobe staple. As soon as I completed my sewing I boxed it up, sealed it with a kiss and ran to the post office. I was so happy to see Marissa wearing the dress in a recent photo.


Pattern: Megan Nielsen Cara top
Size: small
Fabric used: So Sew English modal, red
Time estimate: 3+ hours, including fitting and sewing

Cost to Make:
pattern - $14
fabric - $21.50
elastic - from stash
thread - from stash
TOTAL: $35.50

Read more »
Marissa
1 Comments
Sheona Dress with Pockets

Sheona Dress with Pockets


I love my new Sheona dress and as a bonus, it has pockets! You can read my full tutorial and get the FREE pocket pattern piece on the AK Patterns blog here.

The Sheona has simple style lines and allows me to prominently feature fabric I love. I was careful with the floral pattern placement and really like how it appears to be climbing up the sides of my dress.

I did make a few adjustments to the pattern to get the best fit for my body shape, bringing the waist in an inch on both the front and back pattern pieces and using a French curve to grade out about 3 inches above and 4 inches below my waist. One additional adjustment I would make in the future is to add a bit more ease to the hips.

You can read all the details on how I added pockets to my Sheona dress on the AK Patterns blog here.

Pattern: Sheona Dress with 3/4 length sleeves
Size: 8
Fabric used: Liverpool polyester knit
Time estimate: 4 hours, with fit adjustments

Cost to Make:
pattern - $10 estimated value
pattern printing - $2 estimated value
fabric - $13
thread - $5
TOTAL: $30 value

This pattern was gifted to me in return for a blog post and all opinions are my own. I do truly love my new dress!
Read more »
Marissa
0 Comments
Fit and Flare Easter Dress

Fit and Flare Easter Dress


Easter is am important holiday to my family and one we always celebrate with a new outfit to wear to church. This year it seems we won't be celebrating in person, but I'm glad to have made a new friend through the making of my dress.

Mackenzie, of Bobbin and Button, and I decided to collaborate and make the same Easter dress. Sticking with our desire to use resources we already owned we went with a New Look pattern (6447) she owned and I used fabric from my stash. Actually, this raspberry wool crepe and white silk lining were gifted to me by a fellow sewist making this dress a perfect representation of the joy and friendship I've found in the sewing community.


As it turns out, Mackenzie and I are much the same size, needing to grade the bodice from a size 10 at the top to a size 12 at the waist. I made a size 12 in the skirt, used the size 12 darts, and of course tissue and pin fit the bodice before cutting into my beautiful fabric. You can see the whole process in my Instagram story highlights.

I truly love how this dress turned out. It is nicely fitted without being too tight and would be appropriate for me to wear to church, work, and a variety of other occasions. And the fabric combination of wool crepe and silk make this dress comfortable to wear in any environment. I was initially concerned about the high, boat neckline but it fits quite comfortably on me and I'm thrilled with just how invisible my zipper really is.

The most difficulty this pattern gave me was in keeping the midriff piece sorted in my mind. I think there was a slight difference between the top and bottom, but it was difficult to tell after working with the fabric a bit. I think this may become a tried and true pattern for me and I'm having a hard time thinking about what I would change in the future. That's not true; I might add pockets next time!

If you're looking for a classic dress pattern with fairly easy to interpret instructions (I only had to call my mom to interpret one direction!) I would highly recommend this pattern. And if you're looking for encouragement and some quality sewing advice, go check out Mackenzie's blog.


Time estimate: 15 hours
Size: 10-12
Fabric: raspberry wool crepe, white silk
Care instructions: dry cleaned

Cost to make:
pattern: $9
fabric: gifted
zipper: $4
*used stabilizer and thread from my stash
TOTAL: $13
Read more »
Marissa
0 Comments
Lady McElroy Cotton Poplin Shirt Dress - Minerva Makers

Lady McElroy Cotton Poplin Shirt Dress - Minerva Makers


I simply love this dress, from the perfect color palette to the tailored fit it is sure to be a staple in my wardrobe. I took my time tissue fitting this dress and love the results. It reminds me to slow down and enjoy the process because I will love my finished garments so much more. What a hard lesson that has been to learn!

You can read about my fitting process and see more pictures of the finished garment on my recent Minerva blog post and purchase the same fabric while you're there!

This fabric was gifted to me in return for a blog post and this post contains affiliate links. I would absolutely purchase and make this dress again! Thank you for your support.
Read more »
Marissa
0 Comments
Vogue 1499 - Easter Dress Inspired by Catherine, Duchess of Cambridge

Vogue 1499 - Easter Dress Inspired by Catherine, Duchess of Cambridge


I have been so inspired by both of the duchesses style. I want to act like them and dress like them! So I’ve been working on a few special sewing projects to replicate garments I’ve seen Kate and Meghan wear.

For Easter I made Vogue 1499, similar in style to a dress Kate wore in Germany in 2017. My version had the same general style lines as Kate's dress, with Dior darts, a pleated skirt, and yellow lace overlay. The shade of yellow lace I used for my dress is much less saturated than Kate's dress, my skirt has more pleats and cap sleeves, and my lace fabric has a scalloped lace edge.

This Vogue pattern is made for crepe, linen, and silk dupioni fabrics. I used a white faille fabric with a nylon lace overlay from JoAnn. I cut each pattern piece in the faille as well as the lace and basted them together inside the 5/8" seam allowance, essentially creating one piece of fabric. This method worked well in most places, although I did cut four sleeves in the faille fabric and follow the pattern instructions for sleeve assembly, adding the lace overlay after the sleeves were assembled. I also needed to leave a few inches unstitched at each skirt side and back seam to allow me to hem the white fabric before stitching the rest of the side and back seams together.


Although I love how this turned out, getting the fit right was frustrating. According to the pattern instructions I should have been a size 12. I know that I am usually an 8-10 in traditional tissue patterns, but couldn't find any finished measurements for the bodice and therefore decided to be safe and cut the larger version. I tried to tissue fit the bodice pattern pieces to myself, but usually find this fitting technique works best with a second person assisting. Wow did I regret cutting the size 12 later! I ended up taking 1" off the bottom of the bodice to shorten the torso and removed 1 3/8" from each side at the center back. I ended up making so many fit adjustments that I was entirely overwhelmed at the thought of recreating my adjustments for the lining and ended up putting the whole project off until the last minute. In the end I did not line the dress, opting instead to use single fold bias tape to finish the neck and underarms. This was the first time I used bias tape in place of a facing or lining but I am thrilled with how it turned out and plan to use that technique again in the near future.


Overall I am thrilled with my version of Kate's yellow lace dress. I usually try to avoid wearing yellow, which doesn't look great on my skin tone; however this lighter yellow has me convinced to try yellow again. I wish the bodice of the dress was a bit more fitted and would likely make a size 8 if I were to make this pattern again.

Have Meghan and Kate's style inspired you?

Time estimate: 12-14 hours
Size: 12
Fabric used: white casa dahlia high shine faille fabric, 2 yards and sunshine casa collection lace fabric, 2 yards
Care instructions: machine wash cold, line dry

Cost to make:
pattern: $6
faille fabric: $14
lace fabric: $16
invisible zipper: $3
thread: $2
*used bias tape, and hook from my stash
TOTAL: $41

Resources
Professor Pincushion's tutorial for bias tape finish
KateMiddletonStyle.org for pictures of Kate
Read more »
Marissa
0 Comments
Autumn Rifle Paper Co. Fringe Dress

Autumn Rifle Paper Co. Fringe Dress


I've had my eye on Chalk & Notch's Fringe dress pattern for a while now and was finally inspired to make my own autumn version when I saw this burgandy Amalfi Rifle Paper Co. rayon at my local fabric store.

I've had a crush on Rifle Paper Co. fabric for a while now, and have a sizable hoard, but have been too afraid to cut into any of my stash. Until now. And I'm so glad I did!


I purchased my Fringe dress pattern a few weeks in advance and had it printed using pdfplotting.com. This was my first time printing indie patterns through an online .pdf printer and I was surprised at how easy and inexpensive they were to print. If I can plan far enough in advance I will certainly be doing this for the rest of my indie patterns.

I was very thoughtful about how I cut out my pattern pieces, aligning floral motifs across top and bottom pieces. I used my rotary cutter and mat to cut out the fabric pieces for the first time and was fairly happy with how that worked, although I should probably get a smaller rotary cutter if I plan to cut more patterns this way in the future. I made a mistake at this point and accidentally cut out the material for the darts. Thankfully this dress isn't extremely fitted and I was able to take slightly thinner seams and still make it work.

I had difficulty turning the ties and ended up simply ironing and top stitching them. I also sewed the ties into the side seams instead of the darts, as a stylistic preference. Although I thought I was being careful I caught about 1/2" of the right tie in the back waistline seam. I decided not to pick out that seam and re-sew it since I am likely to only tie the ties in the back of the dress and I had already serged the seam when I discovered my mistake.


I really like how this pattern dealt with the insertion of pockets. This pattern called for fusible stabilizer at the opening of the pockets, which I'm sure will make a big difference in how well the dress wears over time. Once the pockets were completed I tacked them toward the front. I plan to add stabilizer to all of my pocket openings in the future as well as tack them in place.

I love sewing with wovens and this rayon was a dream to work with. I especially like how this fabric ironed so well, allowing me to get a crisp neckline facing and curved hem. I will certainly be using more of my Rifle Paper Co. stash in the near future and hope to make the Fringe dress again too.


Time estimated: 12 hours
Size: 4
Material used: 100% rayon
Care instructions: machine wash warm or cold, tumble dry low, iron low in needed

Cost to make t-shirt:
pattern - $14.00
.pdf printing - $4.00
fabric - $41.25
*used existing thread and interfacing
TOTAL: $59.25
Read more »
Marissa
1 Comments
[name=Marissa] [img=https://blogger.googleusercontent.com/img/b/R29vZ2xl/AVvXsEgft-3vDDqLpq4lxEo2Wx4YkE4-TQNU7SAldhEeqsnJ5NGKN48OSU2c-E6TmDZGf5IPiR6oTsNR332bRJ3dZZcIO7bkMkNpuXcp1K9AtFQ5rlu0kfvBzzjk-gyIKt6lGyYAM1HQ5b-z1Xg/s355/NielsenFamily19Final-11+%25282%2529.jpg] [description=Hi, I'm Marissa, a hobby seamstress. Thanks for joining me on my journey as I create a handmade wardrobe. Like and follow via the social media links below to see my newest makes!] [(instagram=https://www.instagram.com/sew_help_me)] [(facebook=https://www.facebook.com/SewHelpMebyMarissa)] [(bloglovin=https://www.bloglovin.com/blogs/sew-help-me-19274771)]