Showing posts with label Simplicity. Show all posts
Colors of Korea Formal Simplicity Dress

Colors of Korea Formal Simplicity Dress


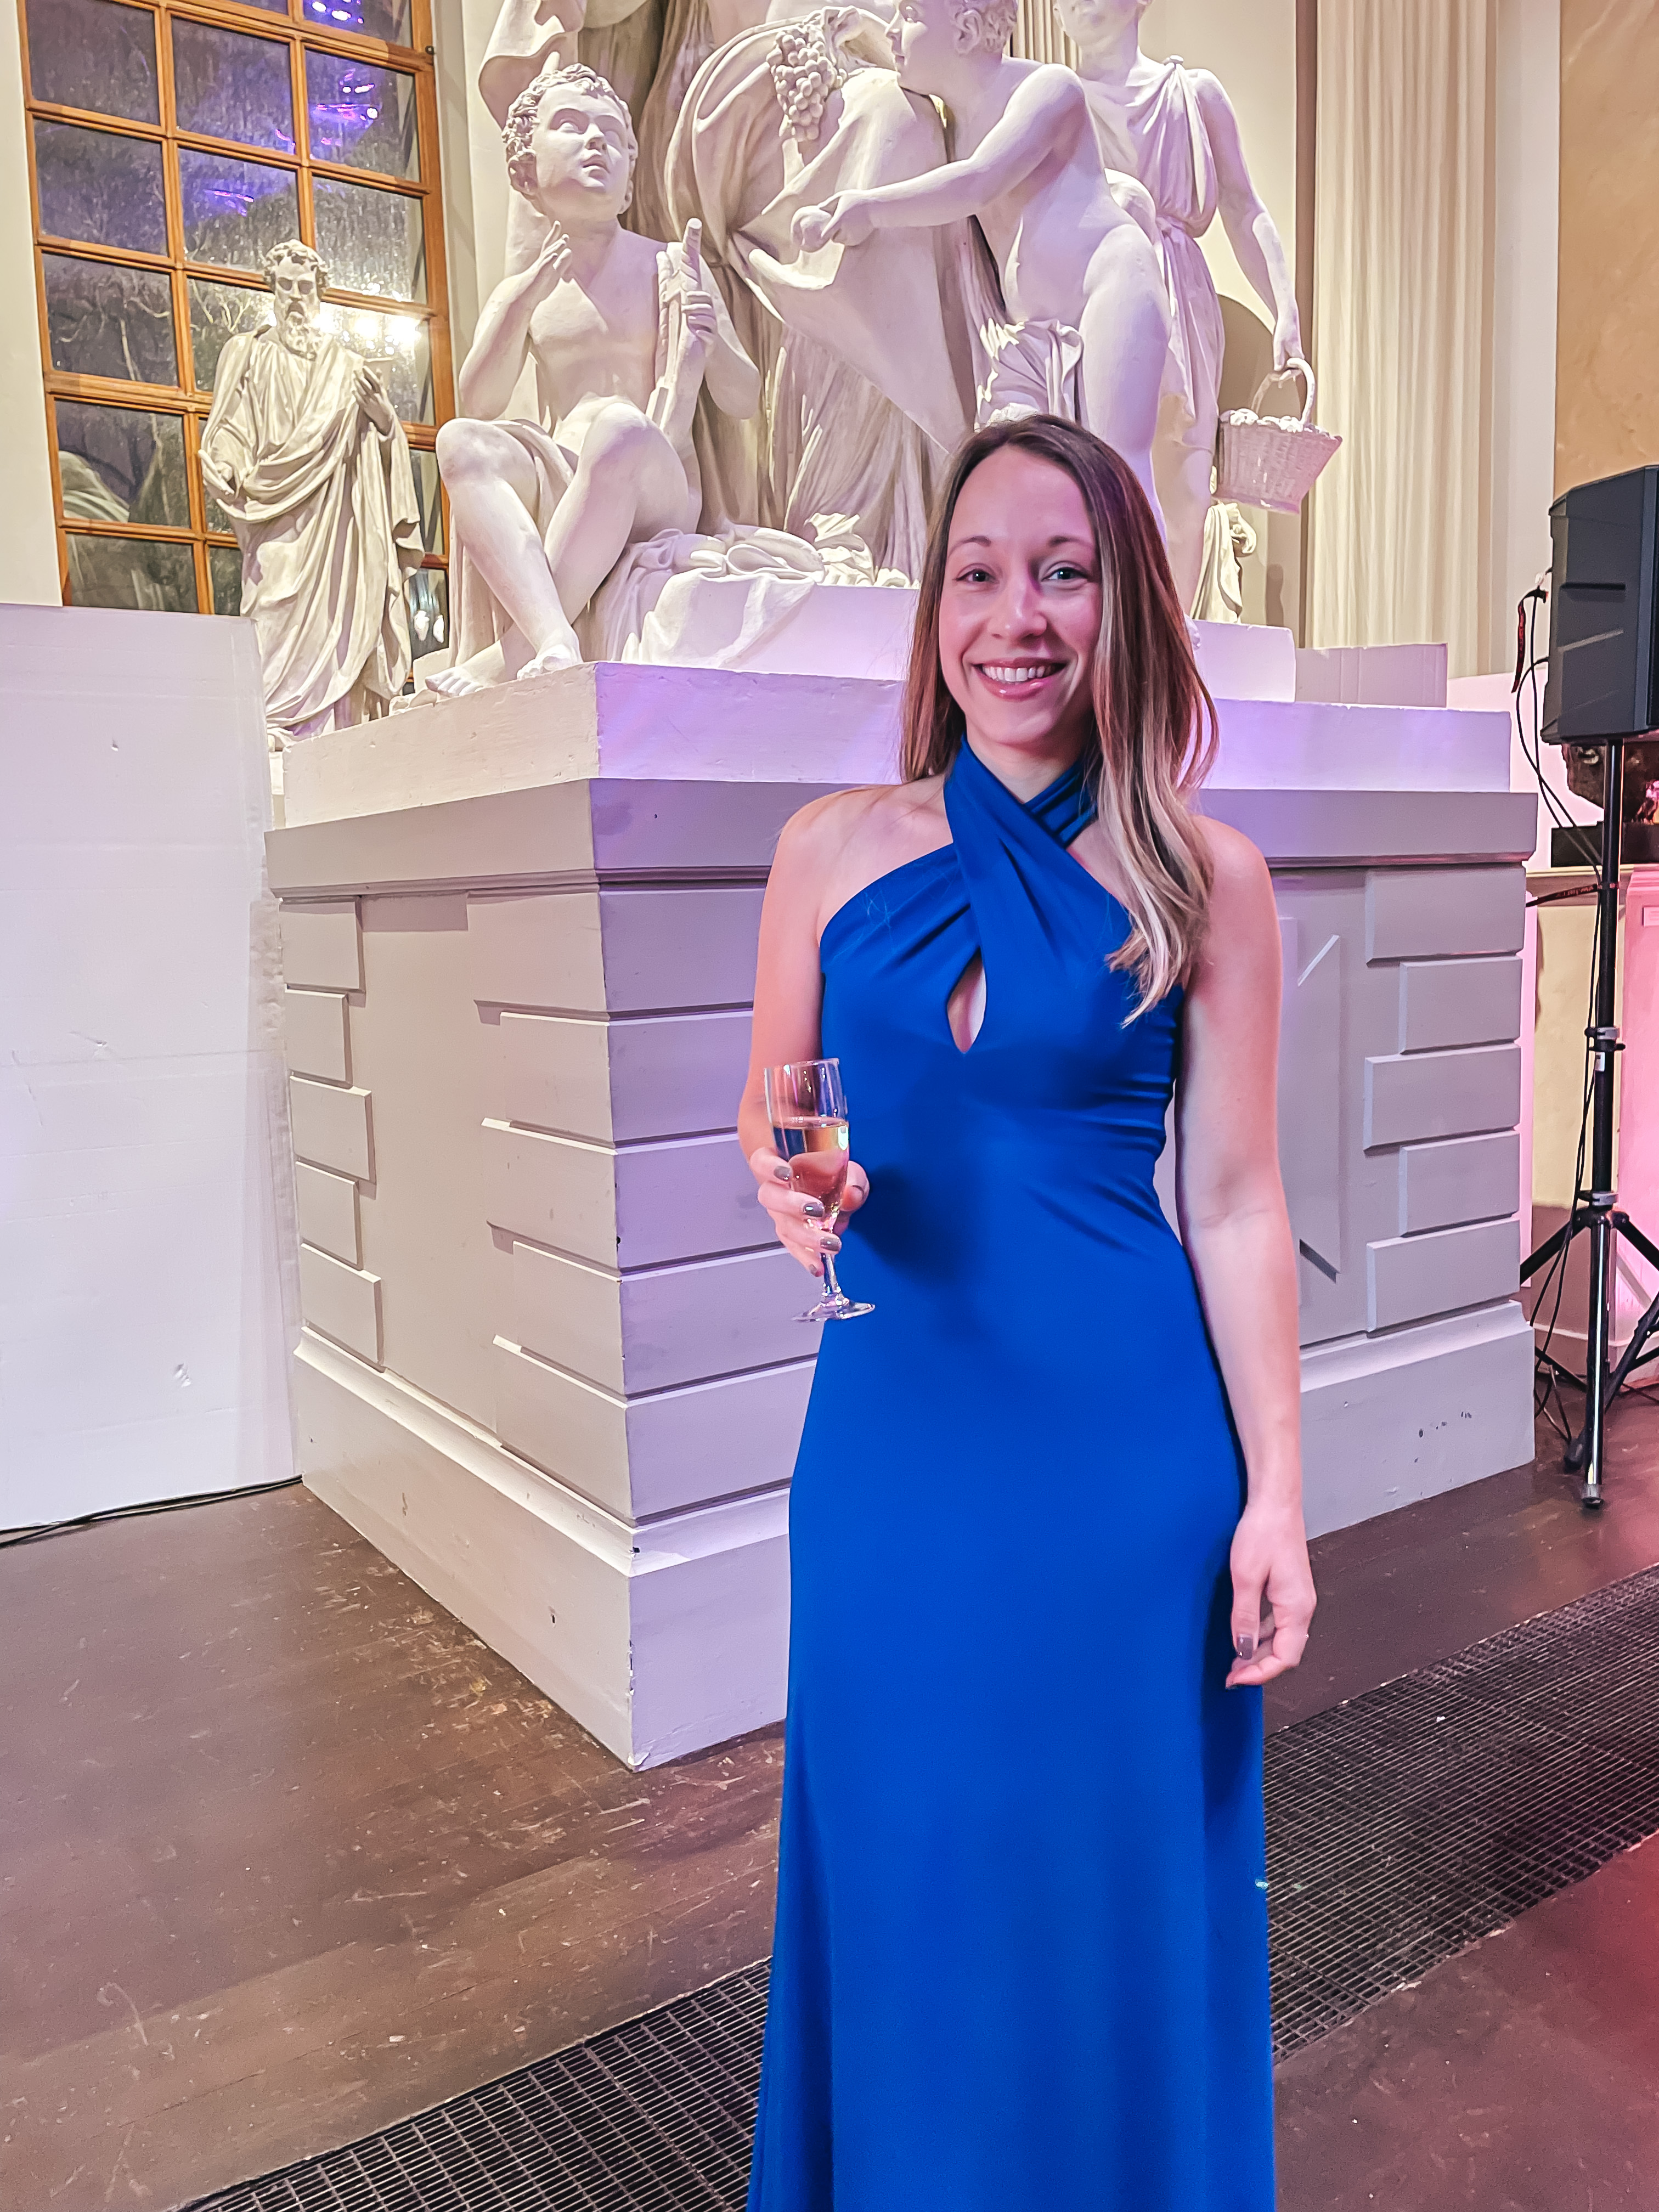
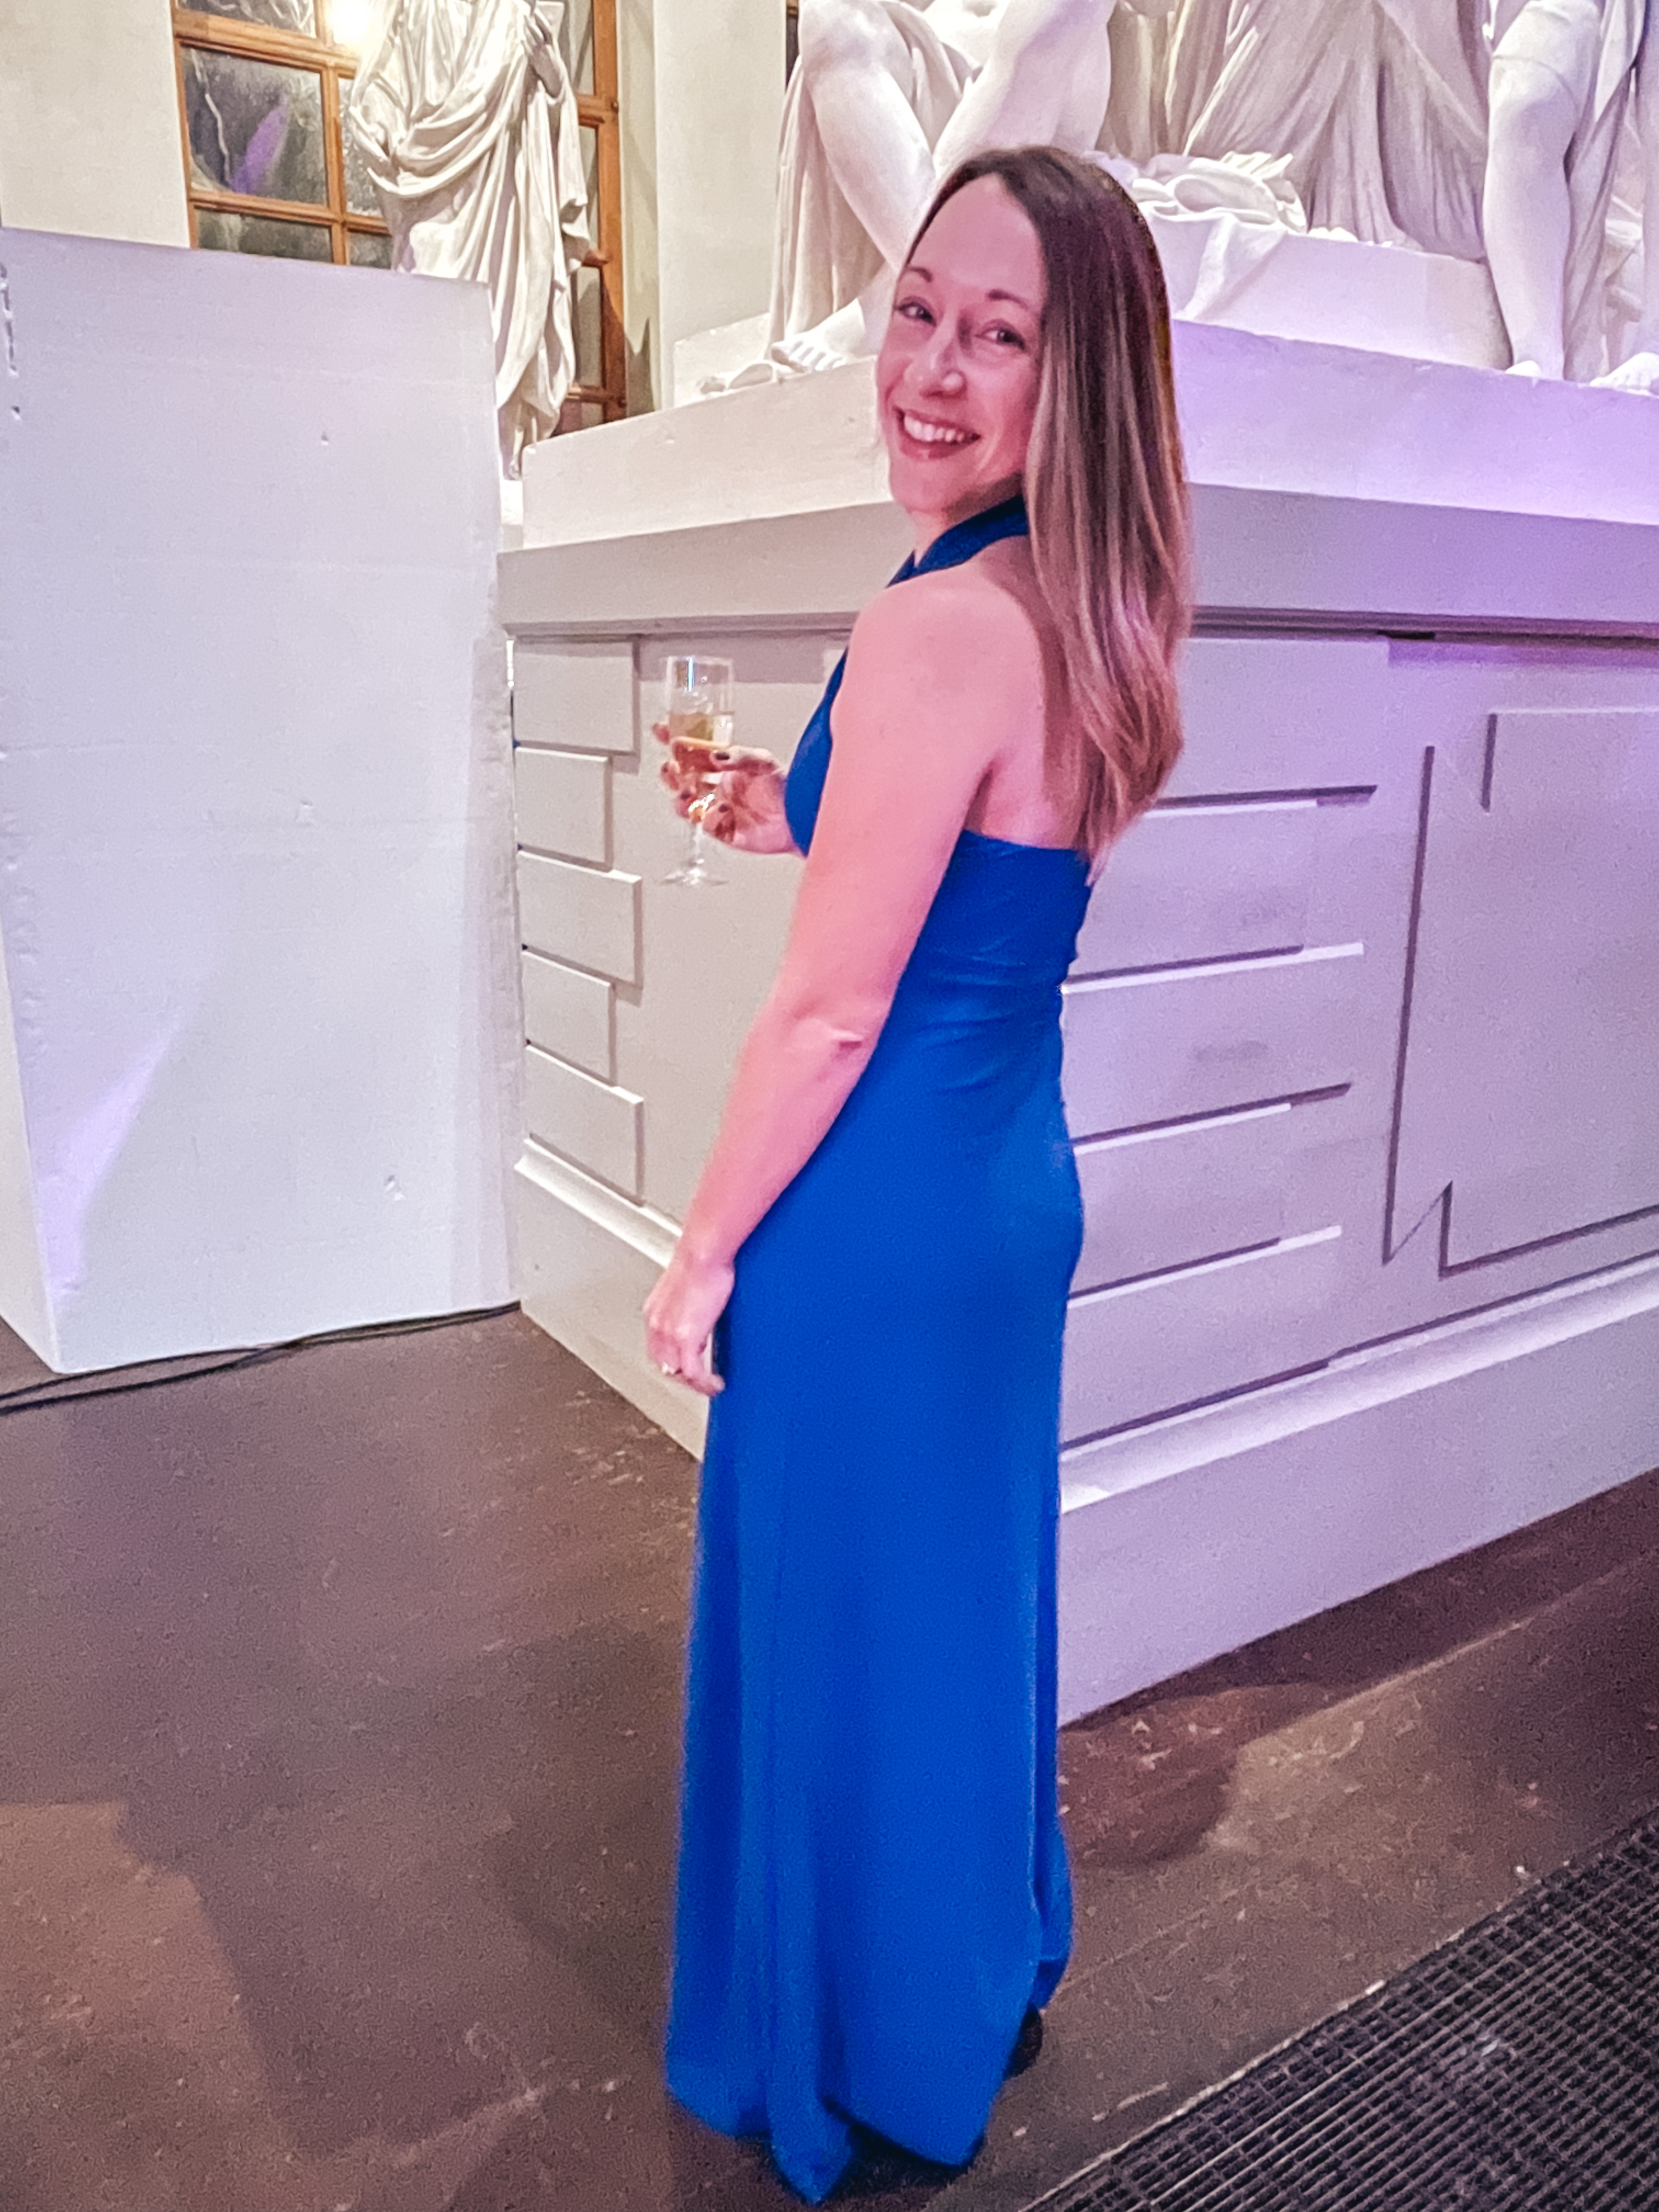
My husband and I recently took a trip to Sweden and attended a formal gala themed "The Colors of Korea." We were asked to wear colors from the South Korean flag and I didn't have a dress for the occasion, so you know I made one!

Over the course of the next year it is my goal that each new make of mine uses a fabric and/or pattern from my stash. I needed to purchase a fabric for this dress since I didn't have one in my stash that fit the dress code so I searched my stash for a pattern I already owned and found Simplicity 2580. I originally thrifted this pattern for a very inexpensive price since it looked like something I would wear, but I didn't have any specific plans for it. Glad I grabbed it when it was available!

Working with this fabric was a breeze, even when I needed to unpick seams a few times. However, I really struggled with the sizing and ease of this pattern. My measurements had me in a size 12/14 but I am usually a size 10 in Simplicity patterns so that's what I cut. I ended up taking three inches out of the bust in a number of increments and could have taken a bit more out. But the hips were a good fit so I graded from the under-bust to the hips. Thankfully there was elastic in the center back to help hold the dress up.

This view of the pattern called for a tie closure behind the neck but I decided to trim down the ties and sew them together at the center back to create a more formal look. To get into the dress I really have to shimmy my head through the opening. This may not have been the best idea, but it was the quickest fix. I also cut an additional three and half inches off before the bottom of the skirt before hemming it.

Ultimately the dress looked great and I felt comfortable eating in it. However, the weight of the fabric pulled the dress down as the night wore on and I needed to readjust the tension at the front of the neck multiple time throughout the night. It was choking me! I may wear this dress again because I've already made it, but I honestly wouldn't make View E again.

Pattern: View E of Simplicity 2580, printed in 2009
Size: 6-10
Fabric: 2 1/2 yards of matte jersey knit fabric with 50% stretch, 94% polyester and 6% lycra, machine wash and line dry
Time: 4-5 hours due to fit issues, it should have taken much less time

Cost to Make:
pattern - $1-5, I can't remember the exact cost
fabric - $8.99/yard, for a total of $22.50 (but it often runs 30%)
*elastic and thread from stash
TOTAL VALUE: approximately $25
Read more »
Marissa
0 Comments
Birthday Dress

Birthday Dress


I recently had a color analysis and learned I was a “calm summer” and should focus on garment fabrics that are cool, light and muted to highlight my best features. As soon as I saw this beautiful John Kaldor cotton sateen that featured at least three of my best colors I knew it would make the perfect birthday dress!

You can learn all about how I made it on Minerva now. And to make your own special outfits with this beautiful John Kaldor cotton sateen visit my affiliate link.

This fabric was gifted to me in return for a post and this post contains affiliate links. I love my birthday dress and will certainly work with this cotton sateen again! Thank you for your support.
Read more »
Marissa
0 Comments
Mens Slim Fit Button Up Shirt

Mens Slim Fit Button Up Shirt


Paul wears button up shirts at least six days a week, but has trouble finding a shirt that is slim enough for him. I was so glad when I saw Simplicity 8753, with a slim fit view and picked it up right away. As soon as I saw this gorgeous Italian cotton on super sale at my local fabric shop I just knew it would be a perfect match for the S8753 and I had to have it for Paul.

Thankfully, I had recently taken the Palmer Pletsch Tissue Fitting button up shirt course with Evelyn and was able to implement those techniques to make a perfectly fitted shirt for Paul. I started by taking his measurements and learned that Paul was a size 38 in the chest but a 34 in the waist. I cut out the tissue pieces in the larger size, pinned them together, and had Paul try it on. I ended up bumping the side seam out to a 36 to allow him more room to move and breathe. I also shortened the sleeves by an inch, then cut out the fabric. Although this plaid is a repeating pattern it is not a balanced plaid so I took extra care in cutting out each piece.

Paul got another fitting once I had the fabric pieces cut out and pinned together. At this point I made a few additional changes, letting out the side seam a bit at the hip and thinning the sleeves by one inch. Then I was ready to sew!


I had the opportunity to try two new-to-me sewing techniques with this pattern, sewing sleeve plackets and flat felled seams. I can't say enough good things about the instructions in this pattern, which led me to gorgeous results and I was thrilled to add a few new sewing skills to my repertoire. One additional thing I really appreciated about this pattern was the additional pattern piece to help aid with button placement - no more wonky button placement! I know this will become a tried-and-true pattern in my collection. If you've been thinking about purchasing this pattern, or own it but haven't made it yet, I can't encourage you enough to give it a try!

The fitting and pattern matching took as much or more time than actually sewing the shirt. I have been practicing slower and more intentional makes and found this one extremely rewarding. Thankfully Paul loves it too!


Time estimate: 20 hours
Size: 38
Fabric used: 1 7/8 yards, Italian cotton
Care instructions: machine wash, tumble dry low

Cost to make
Pattern: $15
Fabric: $16
*used thread from my stash and buttons from my mother's stash
TOTAL: $31

P.S. Check out my Insta stories, @Sew_Help_Me, to see the fitting process step-by-step!

Photos by K.Willerick Photography
Read more »
Marissa
0 Comments
Sew Family Jammies

Sew Family Jammies


When I was a little girl I spent every Christmas Eve at a candlelight service with my family, then we would come home and open a few presents from my Auntie and Uncle David. I remember one special year very fondly; Auntie had gotten my sister and I each a new set of pajamas with a matching nightgown for our Barbies. Barbie and I went to bed and woke up to find Santa had come with new toys for each of us.

I was excited to learn about #SewFamilyJammies and join in making a set of matching Christmas pajamas for my husband and I. I think this is the first time my pajamas have matched someone else's since that Christmas Barbie and I shared a matching set!

I chose a classic red and black buffalo plaid snuggle flannel for our pajama pants and a black rayon spandex blend for our shirts which I purchased at JoAnn on Black Friday for 70% and 50% off! With such little time between Thanksgiving and Christmas this year I was only able to finish the pajama pants before Christmas, but I do plan to make our shirts soon. I used the same pattern to make a tank top for myself earlier this summer and know I like the fit.


Since I was sewing a plaid I wanted to try to "out smart" the pattern, which had a separate front and back piece, by combining the two pieces at what would be the side seam. In my mind, this would eliminate pattern matching and some work by removing a few seams. However, the pattern was slightly rounded at the hips, so I needed to cut each piece separately. This pattern didn't come with pockets, but since the pattern does have a side seam it would be easy to add them.


I used the sewing pattern markers to make sure the plaid was aligned on the front and back pieces, then I laid one set of front and back pieces on top of the fabric, matching plaids, to cut the next set of front and back pieces. The snuggle flannel is only 42" wide and as it turns out I didn't get enough fabric for two sets of pajamas. I cut a size medium for Paul and a small for myself, after going on an extra fabric run!


I stuck to the pattern instructions, only deviating to hem the pajamas to our height and "stitch in the ditch" to tack the elastic at the side seams. I just HATE when elastic waistbands roll and wanted to prevent that. We love how they turned out.


Merry Christmas from our family to yours!

Time estimate: 4 hours total
Fabric used: 100% cotton
Care instructions: machine wash gentle; no chlorine, bleach or fabric softener; tumble dry low; cool iron

Cost to Make
Pattern: gifted from my mother
Fabric: $16
*thread and elastic from my stash
TOTAL: $16


To follow the rest of the #SewFamilyJammies blog tour, visit these blogs too!
December 2  Teri // Fa Sew La
December 4  Sierra // Seams Like Sierra
December 6  Emily // Replicate then Deviate
December 10  Heidi // Handmade Frenzy                
December 11  Sharon // Sweet Mama Life
December 12  Carrie // Beri Bee Designs
December 13  Katie // KatieKortman.com
December 16  Melissa // A HAPPY STITCH
December 17  Taish // Blooming Skies
December 18  Leanne // Thready For It
December 20  Brooke // Idle Sunshine
December 21  Marissa // Sew Help Me
December 23  Lara // Handmade by Lara Liz
December 24  Kelly // Petite Stitchery
December 25  Jess // Broad In The Seams
December 26  Victoria // Victoria Beppler
December 27  Heather // Heather Handmade
December 28  Sylvia // The Ravel Out
December 30  Victoria // Victoria Lucille Anne
December 31  Teronia //  Sew Haute Blog
Read more »
Marissa
2 Comments
Floral Tank Top

Floral Tank Top


I recently went home for the weekend where I spent hours with my mom looking through her collection of sewing patterns. She let me borrow more than a dozen and my sewing queue is full. Be on the look out for a few vintages pieces in the near future!


This pattern is one that I discovered in her collection, Simplicity A2116. It's a pajama pattern, but I love how classic the shape of this tank top is and knew it would be a quick sew. And Mom had a bundle of So Sew English fabric she was willing to share! You know how I'm a sucker for a good floral.


The pattern instructions called for turning under and top stitching all raw edges, but Mom and I wanted to add a neckband and armbands for a more classic look. To create these pattern pieces we measured the arm holes by standing a measuring tape on its edge and reduced the length to 87.5% of the opening length and adding 1/2" for the seam allowance. I sewed these in first and liked the finished product, but it was a tight fit, so I tried 90% of the opening length plus 1/2" seam allowance for the neckband. Although it was easier to add the neckband than the armbands, I would like the neckband to fit a bit more snugly and would reduce it to 87.5% if making this tank top again. The neckband and each armband was cut at 2" in depth.


I was able to try a new, more decorative stretch stitch on the hem of the tank top and serged all interior seams with nylon stretch thread on both loopers. This tank top is sewn to be lived in, and I'm sure it will get a lot of wear this summer.


Time estimate: 3 hours
Size: 10
Fabric used: knit blend from So Sew English scrap bundle, unsure about specifics!
Care instructions: cold water wash, line dry (just to be safe)
Cost: free to me!
Read more »
Marissa
0 Comments
Mimi G High-Waisted Skinny Pants

Mimi G High-Waisted Skinny Pants


I recently made Mimi G's high-waisted skinny pants, Simplicity 8655, using stretch gabardine suiting from Minerva Crafts and LOVE how they turned out! Thankfully I was able to sew along with Mimi herself through her amazing sew along video on Youtube. You can read all about my experience making these pants on Minerva's blog here!

Now I've made both the tie-front top and pants from the same pattern, both using Minerva fabrics. You can see my tie-front wrap top blog post here. I love both of these pieces, together or separately!


This fabric was gifted to me by Minerva Crafts. You can purchase the John Kaldor Paris silky satin fabric and stretch gabardine suiting through my affiliate links here.

Pictures by Sara at saraballenger.
Read more »
Marissa
0 Comments
Mimi G Tie-Front Top

Mimi G Tie-Front Top


Today I'm featured on the Minerva Craft blog in my new Mimi G tie-front kimono style wrap. This has been the perfect topper for a changing season and was a very quick make. Mimi G even walks you through all the step in a video guide on YouTube. If you have this pattern, it's time to make it!

This fabric was gifted to me by Minerva Crafts, but the opinions are all my own. You can purchase this fabric through my affiliate link here.
Read more »
Marissa
0 Comments
Leanne Marshall Cape Coat

Leanne Marshall Cape Coat


I saw this Leanna Marshall cape coat pattern at JoAnn this summer and was immediately inspired to begin working on my first piece of outwear. JoAnn was having a pattern sale and I purchased this pattern for only $2.00! Wanting to copy the envelop sample almost exactly I found some light gray heathered sweater knit and purchased all the store had, 1 1/2 yards.


I used the body measurements chart on the back of the pattern envelop and decided to make a size 12, meaning I needed 3 yards of outer fabric to make the long version of this coat. I only had 1 1/2 yards, but kept looking for matching fabric every time I went to JoAnn... which was admittedly quite often. Not finding the fabric I needed I eventually turned to the sewing community through a few different Facebook groups and found an amazing woman who was willing to ship her matching, uncut yardage to me for only the cost of shipping. Kayla, THANK YOU, I truly couldn't have completed this project without your generosity!

As I said above, this coat was my first outwear make and it was also my first lined jacket in a decade. The pattern was coming along quite well, until I tried to add the lining to the outer portion of the coat. The instructions said the front lining panels should be smaller than the corresponding outwear panels, but they were the same size. I was stumped! After setting the project aside overnight and coming back to it fresh I discovered that I had accidentally cut the front lining piece from the same pattern piece as the outer panel. It wasn't just me, it really was too big. Using all the correct pattern pieces the lining was easy to install.


I chose a two-way separating zipper to make the coat as versatile as possible. The installation was very interesting, with the zipper on the left side of the coat being sewn face down and turned 180 degrees each time its zipped up. This technique keeps the zipper tape inside, it isn't exposed when I zip the jacket up. My only issue with this zipper is that the pulls hang below the bottom of the coat, so I have to unzip the bottom of the coat about an inch to hide the bottom pull. I'll need to be more careful when installing zippers in the future, especially if they aren't a two-way separating zipper.

Even though I cut the front outer panels at the same time, the left side ended up about an inch longer, even after letting the coat hang for a few days. I'm not sure what I did there, but was able to correct this issue by inserting that extra fabric into the cape, making the two front panels match. To finish the cape I sewed a Dritz magnet to the edge of the point, and ended up adding an extra one on the other side as well to ensure the closer is secure. I'm not sure how I feel about these magnets; there weren't any pre-made holes. I had to sew through a thin layer of plastic, which ended up bending my hand needle. We'll see how they wear, but I'm not sure I'll use them again.


I love how this pattern turned out and can see myself wearing it fall through spring. I made it roomy enough that I can easily layer under it, although I would probably size down one size in the future. I really like the cape when it lays down across my shoulders but its not a very functional hood for truly cold weather. Thankfully the weather here is pretty mild and I can wear my new jacket right away!


Time estimate: 32+ hours
Size: 12
Fabric used: 100% polyester sweater fleece from JoAnn and cotton blend lining from my stash
Care instructions: machine wash normal, cold, nonchlorine bleach, tumble dry low

Cost to make coat:
pattern - $2.00
fabric - $13.50 for 1 1/2 yards
fabric shipping - $13.50 for additional yardage
two way zipper - $12.00
magnets - $18.50
*used lining fabric and thread from my stash
TOTAL: $59.50
Read more »
Marissa
2 Comments
The Great Big Pattern Swap

The Great Big Pattern Swap


I recently participated in the #greatbigpatternswap, sending two patterns to other sewers and receiving two new-to-me patterns in the mail. I love the idea behind this swap; patterns are easy and inexpensive to mail and you get to meet other fabulous sewers all while curating a library patterns that better align with your wardrobe goals!


Each of the patterns I received were still uncut, so I got to work right away cutting them out while I asked my Instagram friends which pattern I should try first. By the time I was ready to cut into my fabric, Simplicity 1716 was in the lead by a hair. I just love the cowl neckline of views D, E, and F and had enough floral knit fabric leftover from a pair of leggings I made earlier this year that I was able to get to work right away.


The pattern called for stay tape in the shoulder seams and although I knew about this technique before making this top, I think it is the first time I used stay tape in one of my own garments. I've worn the top twice so far and the should seams are holding up well. Adding the stay tape didn't complicate the project in any way and I can see myself using it all other knit tops in the future.


I love how the back neck and arm facings turned out, although the armscye is a bit big for me. In the future I may try to slightly reduce the armscye and slightly elongate the cowl as some of the wrong side of the fabric can peak through from time to time. All in all, this pattern was a super fast sew and I loved the results. I can see adding a number of these tops into my regular work wardrobe rotation! Now to make time to sew my second new pattern...


Time estimate: 2-4 hours
Size: 12
Material used: knit print, 97% rayon and 3% spandex
Care instructions: machine wash cold, gentle cycle, line dry, cool iron as needed

Cost to make leggings:
pattern - free to me, approximately $3.50 to mail one pattern to other participant
*fabric and thread from my stash
TOTAL: $3.50
Read more »
Marissa
0 Comments
Vintage Wrap Dress

Vintage Wrap Dress


I had such a wonderful time participating in the Royal Wedding Sew Along that I decided to do another sew along! After a few detailed formal wear projects in a row I was happy to sew up this less complex vintage wrap dress for the "sew together for summer" wrap dress sew along.


This is a vintage pattern from my mother's stash and one I know fits our body type well. I have often borrowed her green paisley cotton dress from the same pattern but didn't have one of my own, until now. I think every woman needs a wrap dress in her wardrobe, its such a flattering style!


I purchased this wonderful polyester print for $7.99/yard at New Rainbow Fabrics during a spring trip to Chicago. I loved the print, but didn't know what I wanted to make with it so I purchased two yards to add to my stash. I made a few alterations to the pattern including adding pockets (see the vintage newspaper pattern piece,) removing the collar and shortening the sleeves leaving just enough fabric to make this dress and now wearing it reminds me of that trip to Chicago.


I made the dress following the pattern instructions and used a few tips I learned from my leader in the Royal Wedding Sew Along. Lindsey, from Inside the Hem, taught me to use colored transfer paper to indicate my pattern markings which was so much easier than what I had been doing. I also made my interfacings fit inside the seam width to reduce bulk.


This dress is the first time I used lace to finish the hem of a skirt. I really liked that this method allowed for maximum ease with my machine blind hem. I will certainly be using this method again!


I finished my dress with vintage hook and eye closures as well as a medium sized snap where the bust panels meet. As a finial touch I added HeatnBond under the interfacings on the front panels of the dress. This will help to keep the interfacings turned inside and, I hope, keep the snap from pulling too much.

I'm excited to see all of your summer wrap dresses!


Time estimate: 16 hours
Size: 12
Fabric used: polyester print
Care instructions: machine wash cold, gentle cycle, cool dry

Cost to make:
Pattern: borrowed
Fabric: $16
Interfacing, HeatnBond, and notions: from my stash
TOTAL: $16
Read more »
Marissa
0 Comments
Baby and Me Matching Outfits

Baby and Me Matching Outfits


Aren't miniature clothes cuter than full size clothes? I recently made a matching baby and me outfit for my favorite one year old and her dollie out of leftover material from the leggings I recently made and other scraps I had stored in my stash.


This was a quick, fun project. But hemming those tiny little leggings was difficult!


Thankfully I had enough leftover material to make a few matching Coral & Co. knot bow headbands. I just love how they turned out! Check out Coral & Co. for the free knot bow headband pattern.
Read more »
Marissa
0 Comments
Learning to Sew Knits

Learning to Sew Knits


I have been sewing apparel since I was eight years old, one new outfit a year for my annual 4-H project. I LOVED the trips to the fabric store, pouring over the patterns and gorgeous materials. I was always allowed to choose what I wanted to make and the fabric I wanted to use, but aside from sewing one swimming suit I rarely worked with knits.

I love to wear knits. They are soft, comfortable, and easy to care for, so I decided to try my hand at a simple project while I practiced sewing with knits.


I chose this Simplicity leggings pattern, with four individual panels, because I thought it would offer a better fit than the leggings I have purchased RTW. I used a ball point/knit needle on my machine and worked to get the tension correct, sewing the side seams with a small zigzag stitch. Then, I used a twin needle for the first time to hem the leggings and sew the waistband down.


I found it a bit difficult to sew the hem and waistband from the top and need to continue to work on the tension of my seams, but all-in-all I am extremely happy with the twin needle and am not sure why I was scared to try it for so many years!


I made a size small and found this pattern fits a little large. I would size down for a more modern fit if I made these leggings again.


Time estimate: cut and sewn in approximately two hours
Size: small
Material used: knit print, rayon and spandex blend
Care instructions: machine wash cold, line dry

Cost to make leggings:
twin needle - $3.50
pattern - $10.00
material - $13.50
elastic - $1.00
*used existing thread
TOTAL: $28.00 + tax
Read more »
Marissa
0 Comments
[name=Marissa] [img=https://blogger.googleusercontent.com/img/b/R29vZ2xl/AVvXsEgft-3vDDqLpq4lxEo2Wx4YkE4-TQNU7SAldhEeqsnJ5NGKN48OSU2c-E6TmDZGf5IPiR6oTsNR332bRJ3dZZcIO7bkMkNpuXcp1K9AtFQ5rlu0kfvBzzjk-gyIKt6lGyYAM1HQ5b-z1Xg/s355/NielsenFamily19Final-11+%25282%2529.jpg] [description=Hi, I'm Marissa, a hobby seamstress. Thanks for joining me on my journey as I create a handmade wardrobe. Like and follow via the social media links below to see my newest makes!] [(instagram=https://www.instagram.com/sew_help_me)] [(facebook=https://www.facebook.com/SewHelpMebyMarissa)] [(bloglovin=https://www.bloglovin.com/blogs/sew-help-me-19274771)]