
Minerva Core Range Striped Cotton Jersey

This should have been a quick and easy make, but I was stumped on how exactly I was supposed to turn up 5/8" for the front, circular hem portion. After a video call with my mother and a few quick internet searches I found that Brittany made a "Sew With Me" video for this top and she (among others) ran into the same issue. I'm glad I wasn't alone! I needed to clip further than I initially thought I should and took a very scant hem over the curved portion and I was over the difficulties. I used a mixture of zigzag stitches, on the internal seams and seams that would need to stretch, and small straight stitches, on the external hem seams, which won't need to stretch due to the design.
The pattern called for set-in sleeves but, since this is a knit pattern I decided to sew my sleeves in flat making that portion of the pattern a bit easier to assemble. In all, this pattern took four or five hours for me to cut out and sew together. And maybe he's being a bit over the top, but my husband thinks it looks like it could sell for over $100 in a department store. That makes this a pattern worth keeping and making again!
Size: small
Fabric used: Leopard Liverpool from So Sew English
Time estimate: 5 hours with fabric cutting
Cost to Make:
pattern - $1.00 SALE
fabric - $21.50
thread - from stash
TOTAL: $22.50

I recently had the honor and privilege of working with designer Crystal Whitlow on her newest autumn collection, Sunflower Fields. Crystal has so many fun designs for children that I immediately thought of an "auntie and me" mini collection. I'm a sucker for a good floral print and loved the idea of scaling her sunflower designs for different sizes.
I've made the McCall's 7542 twice before, once in an embroidered denim fabric and once in a blue and white shirting, and know I love it. However, I wasn't a fan of the neck facing and the bell sleeves were difficult to hem, so I decided to try my hand at using bias binding in it's place. I was fortunate to find a similar top pattern for little girls, McCall's 7799, and topped off our coordinating outfits with bow tie for him McCall's 7223.
I ordered four different kinds of fabric printed on cotton poplin to create these looks - 2 yards of Large Sunflowers (red) for my top, 1 yard of Sunflowers and Fauna (red) for her top, 1 yard of Elf Red Speckles for our sleeve and bias binding, and 1 yard of Sunflower Stripes for his bow tie. The fabric was a dream to work with, I love how the bell sleeves hold their structure, and each pattern came together quickly. However, I did find cotton poplin bias binding hard to work with and would choose a lighter weight fabric for bias binding in the future.
Tip: I watched Lauren Guthrie's "The Ultimate Guide to Bias Binding" parts 1 and 2, a few times, to learn everything I needed to know about bias binding to successfully install my binding. Thank you for making and sharing these resources Lauren!

Lady McElroy Cotton Poplin Shirt Dress - Minerva Makers
I simply love this dress, from the perfect color palette to the tailored fit it is sure to be a staple in my wardrobe. I took my time tissue fitting this dress and love the results. It reminds me to slow down and enjoy the process because I will love my finished garments so much more. What a hard lesson that has been to learn!
You can read about my fitting process and see more pictures of the finished garment on my recent Minerva blog post and purchase the same fabric while you're there!
Palmer Pletsch Tissue Fitting - M6750
I recently had the opportunity to take a tissue fitting class with a local Palmer Pletsch certified instructor. I have been familiar with the tissue fitting method for some time, but wasn't familiar with the adjustments I needed to make in order to get a well fitted garment. With the help of my teacher I was able to make the best fitting button up I've ever worn!
I used the 
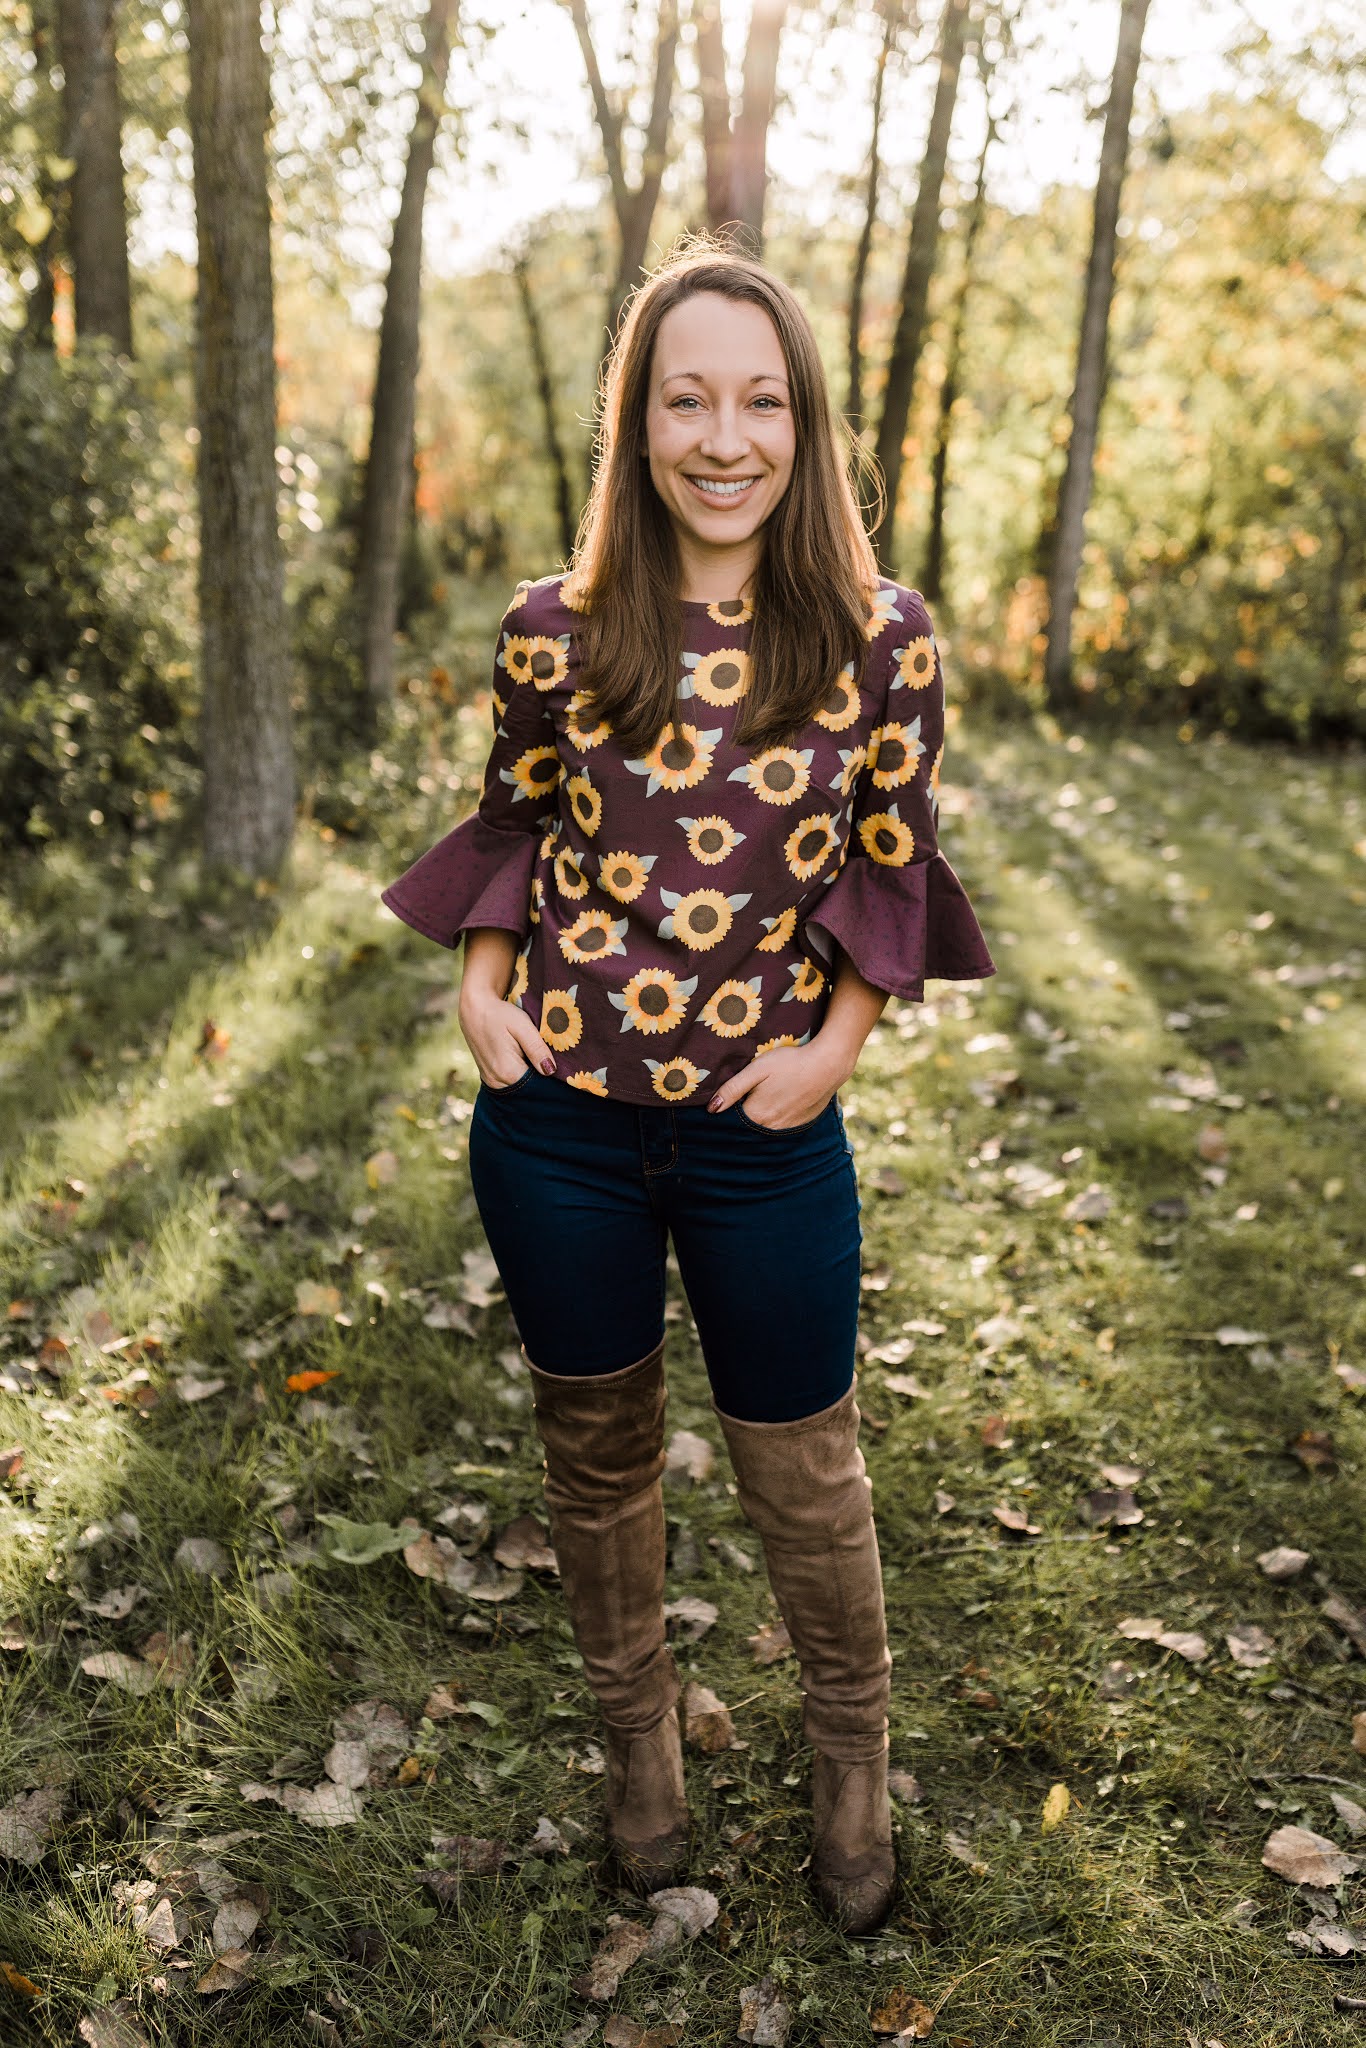
McCall's 6750 Palmer Pletsch button up shirt pattern for this class. The unique thing about using Palmer Pletsch patterns is they include fit lines on the tissue. These fit lines were an incredibly helpful tool as I learned how to make the adjustments I needed.
We started with taking new measurements for me, referencing the size and finished measurements on the pattern envelope, and rough cutting the pattern. Using a red colored pencil I marked seam allowances and pinned out the seam allowance and darts, then tried on the tissue. This first visualization helped me to identify a few fit issues including the need to bring the pattern waist line up to my natural waist and lengthen the bottom of the pattern to keep the original length. I also needed to do a sway back adjustment, bringing the tissue closer to my lower back.
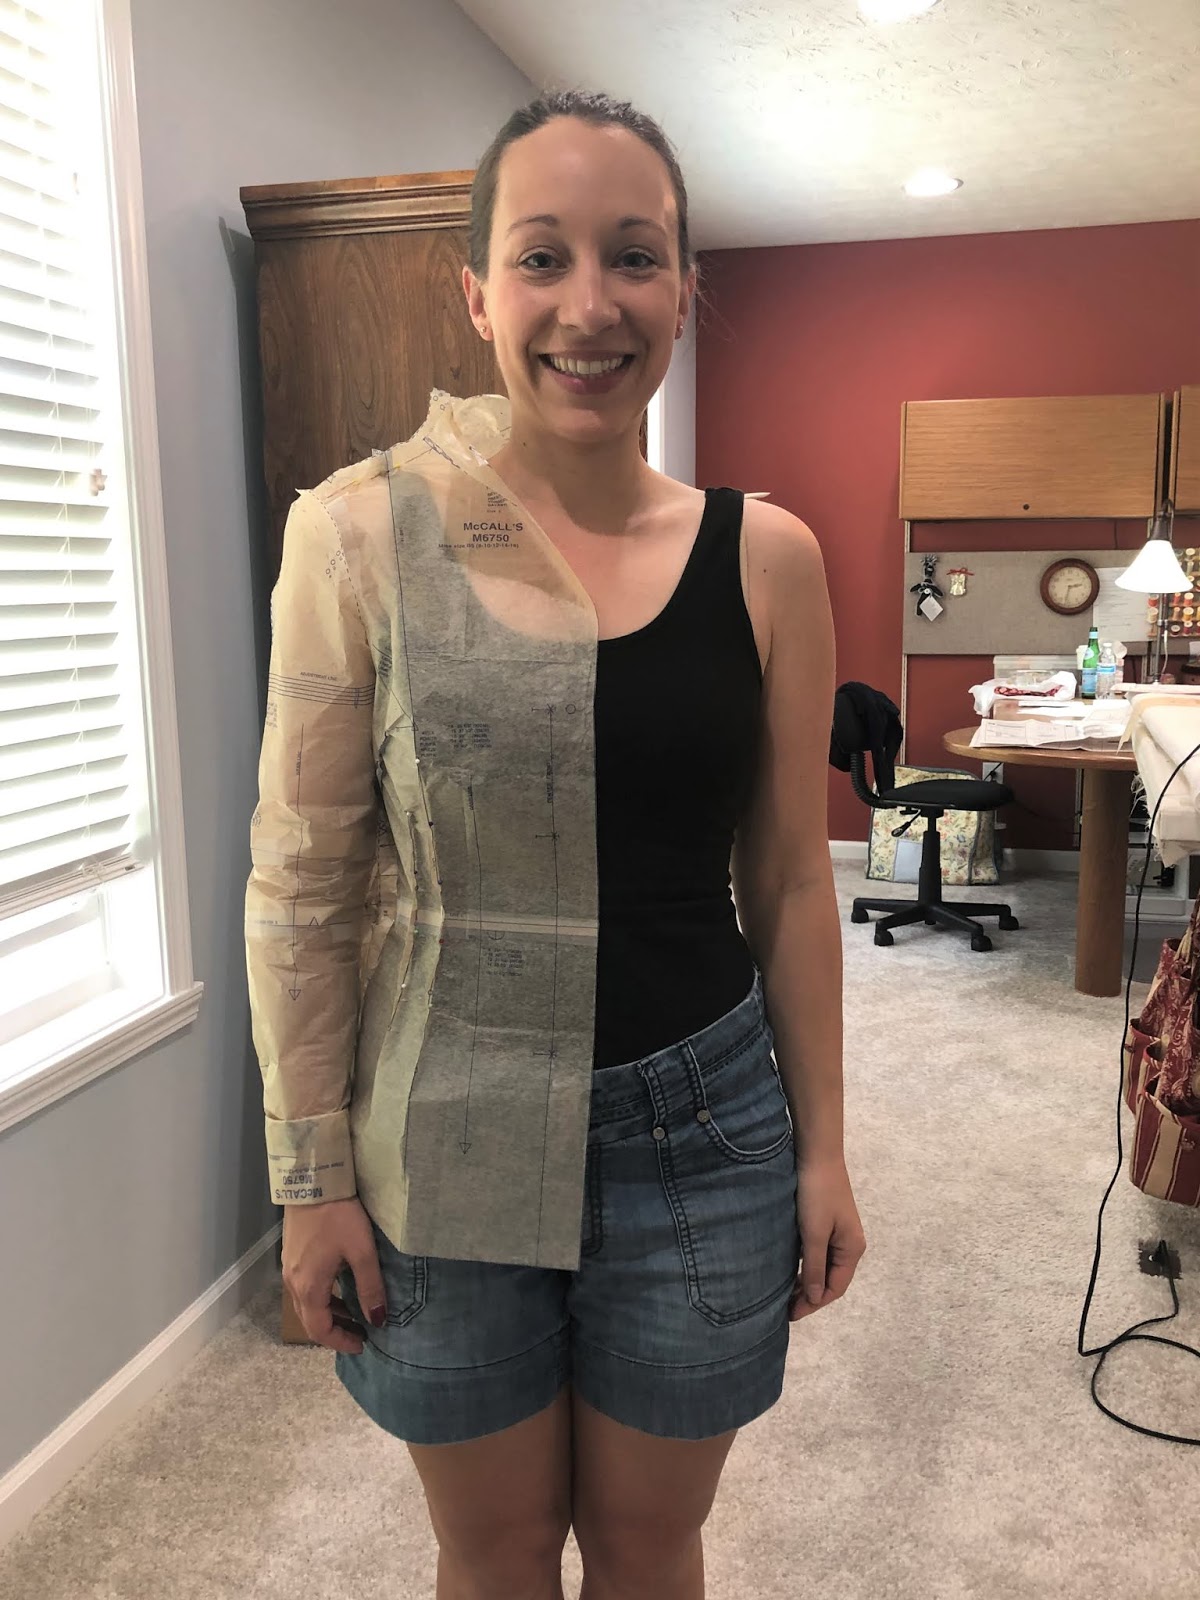
Once these adjustments were made and taped out of my tissue I then needed to fix the darts, making sure they remained parallel to the grainline as indicated on the pattern piece. After making these initial adjustments it was time to cut out my fabric, pin out the seams and darts, and try it on again. The second fitting helped me see a few additional adjustments I needed to make, including a square shoulder adjustment to alleviate some fabric tension across the back of my neck. I also needed to shorten the sleeves, my right side slightly more than my left.
I ended up needing to cut a new back piece and re-pin for a final fitting. It was amazing how much better the final fitting was from the first, and I thought the first fitting was okay. I'm glad to learn how much better it can be! And the goal of sewing my own garments is to get a good fit.
I'm so thankful I took this class and learned how to get a better fit in my handmade garments. I'm looking forward to taking what I've learned and applying it to my future makes. And the silver lining, sewing with a local sewing friend!
I would highly recommend my certified Palmer Pletsch sewing instructor, Evelyn Cummings, if you're in the Indianapolis area. To find a certified sewing instructor in your area visit the Palmer Pletsch website.
Time estimate: 6 hours
Size: 8
Fabric used: cotton blend
Care instructions: machine wash cold, tumble dry low
Cost to make:
Pattern - $5
Fabric - gifted
*buttons, thread, and interfacing from my stash
TOTAL: $5

Embroidered Denim McCalls Trumpet Sleeve Blouse (Minerva Crafts)
Dropping by to let you know I have a guest post over on the Minerva Craft blog featuring a fun trumpet sleeve blouse made in their embroidered denim and McCalls 7542 blouse pattern!
This fabric was gifted to me by Minvera and I truly love the quality of it. You can purchase the same fabric through my affiliate link here.
P.S. See the first trumpet sleeve blouse I made last fall here!

I am so proud of my newest make, McCall's M7542, a trendy bell sleeved pullover blouse in blue and white striped shirting. This top is one of my favorite makes this year and I can certainly see myself making a few more yet this fall. And best yet, this is one of the patterns I won from the #royalweddingsewalong; thanks McCall's!
I cut out a standard size eight and added two inches to the length of the bodice. I love the fit of the finished garment and it is the perfect transitional, summer to autumn top. The fabric is light and airy with a nice drape and with the right and wrong sides of the fabric so similar the inside of the bell sleeve is just a cute as the outside.
I found most of the curved sections of the pattern a bit difficult but manageable with much pinning, ironing, and hand basting. Setting in the sleeve was more challenging for me on this project than it has been in the recent past, feeling like there was just too much fabric to slightly gather into the armscye. With so much gathering the serged seam finish was effective but not very pretty. At least I had a cute companion!
As I said, I'm thrilled with this top and plan to wear it all fall. What are your favorite transitional pieces?
Time estimate: 6 hours
Size: 8
Material used: shirting, 68% cotton, 28% nylon, 4% spandex
Care instructions: machine wash gentle cold, non-chlorine bleach, tumble dry low, cool iron
Cost to make:
pattern - free to me
fabric - $13
*hook and eye, thread from my stash
TOTAL: $13

When playing a relationship game with my husband recently I learned that his least favorite item in my wardrobe was my pair of fleece pajama pants. I can't really blame him since they are high-waters on me and the brand's name literally has the word "grandma" in it. I immediately knew what to do! I grabbed my flannel and this old McCalls loungewear pattern I used a few years ago to make my husband a robe.
I had two yards of fabric, but laying the pattern out was a bit difficult since the bolt was only 45" wide, I needed to cut two of this pattern piece, and the legs were fairly wide. Since I'm so short I needed to shorten the length of the pattern legs and thankfully this allowed me to lay the pattern out across the width of material. I also folded the waist down 1 1/2", using the second and third circles on the pattern to create the hole for my drawstring, shortening the height of the pants.
This was a fast and rewarding project. The pattern fits me well through the hips, although if I were to make it again I would likely take in the width of the pant legs.
My second favorite part of this project, next to the comfy and beautiful fabric of course, is the tag I added to the back. It says "handmade by Marissa" and was a Christmas gift from my mother. Thanks Mom!
Time estimate: 2-4 hours
Size: medium
Material used: flannel
Care instructions: machine wash cold, tumble dry low
Cost to make pajama pants:
material - $10
draw string - $2
*used existing thread and tag
TOTAL: $12